My "todo" List

I am planning to write some blogs at somepoint of time in the future on the following topics:

Spring Framework, Hibernate, ADO.NET Entity Framework, WPF, SharePoint, WCF, Whats new in Jave EE6, Whats new in Oracle 11G, TFS, FileNet, OnBase, Lombardi BPMS, Microsoft Solution Framework (MSF), Agile development, RUP ..................... the list goes on


I am currently working on writing the following blog

Rational Unified Process (RUP) and Rational Method Composer (RMC)

Sunday, March 12, 2017

Project Management - Agile (Scrum) with Jira

Introduction
In this blog I plan to explain how to use a Scrum sprint with Jira as an ALM tool to manage the sprint and monitor project progress during the sprint to understand the pace of progress and possibly take corrective action. You can use the example explained here for the sprints you plan for your project until all features and deliverables are completed for your project. This blog can give you the cookie cutter process that you can easily adapt to suit your needs, as always one shoe does not fit all but I am hoping the blog will at least assist you with how someone else does things so you can come with a contrast which is better (ha ha). One note for Project managers and Agile geeks who go with pure interpretation of how things are done, I may break some of the written rules in either typical waterfall approach of project management or Agile approach of project management while I am explaining a few things here. My philosophy has always being the following – its mission accomplished, as long as work gets done and the project completed successfully with the golden triangle rule (time, cost, scope and quality) in mind. I much rather have an outcome where the projects are completed successfully than a theoretical conversation on why the process described below is not truly Agile or Waterfall.
Project Summary
I am planning to use “one” sprint cycle configuration, planning, execution and closure for a fictitious web based application titled – “MyWebApp” (how creative ha-ha) to show how you can use Scrum as an Agile methodology with Jira as a tool for the same.  The “Scrum Project Flow” section provides you with the various Scrum terminologies and how they are interrelated.
Scrum Project Flow

Overview of the various elements depicted in the above Diagram

Sample Sprint
We usually start a scrum sprint with backlogs and during sprint planning determine which backlogs we should prioritize and consider for the coming sprint cycle. I have picked two User Stories from my backlogs to do sprint planning. For this example I am not using any “Epic”, as mentioned before “Epic” is just a broader categorization that covers multiple user stories (requirements).
User Stories:
I have two user stories configured for the sprint
User Story1:
We need a web site that allows user registration via an online web portal that can be accessed through Chrome, Firefox and Internet Explorer browsers at a minimum, the web site should support at least N-1 version for each web browser.
User Story2:
Once the user registers via the web portal, we want the internal operations staff to review the registration request and then approve or reject the same using a standard Task screen that is used by them for all tasks that are in their operation queue.


Tasks/Sub-Tasks
For the “User Story1”, I have following Tasks and Sub-Tasks created to track work done to complete the User Story
Task1: Create the user interface in WPF and/or ASP.NET for user registration
  • Sub Task1a: Create the User Interface (UI) skeleton with themes and graphics for user registration
  • Sub Task1b: Write the data entry validation for user controls both in client side as well as server side for user registration
Task2: Write the ASP.NET MVC controller to do server-side co-ordination between presentation layer and database layer for user registration workflow
  • Sub Task2a: Write screen specific server side authentication classes and code business logic in class libraries specific to the registration workflow.
Task3: Write the domain classes representing the ORM layer between the database objects (tables) and the controllers
  • Sub Task3a: Create .NET classes in a class library representing the database entities in the database.
Task 4: Write and execute unit test scripts for code validation of user registration screen

NOTE: The above tasks/sub-tasks are just one way in which you can create more specific tasks/sub-task that you can then assign to your Scrum team members to ensure that once they are completed, the user story is completed as well. As always one shoe does not fit all, so go ahead and tweak the above tasks for your specific projects.
During Sprint planning, you will also assign “Story Points” for User Stories and “Original Time Estimate” for User Stories, Tasks and sub-tasks.
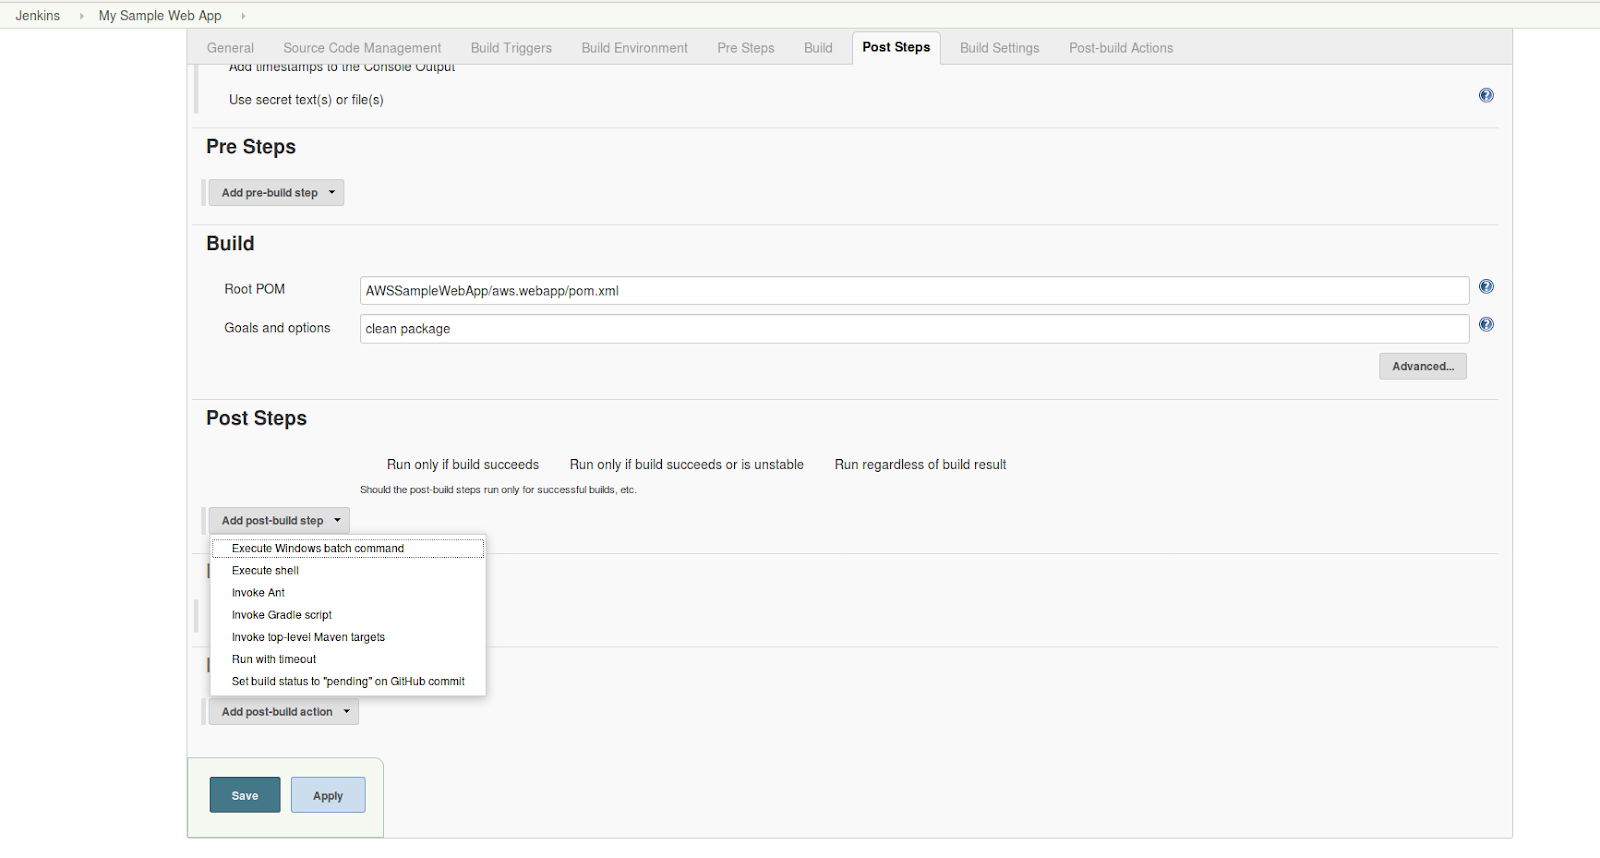
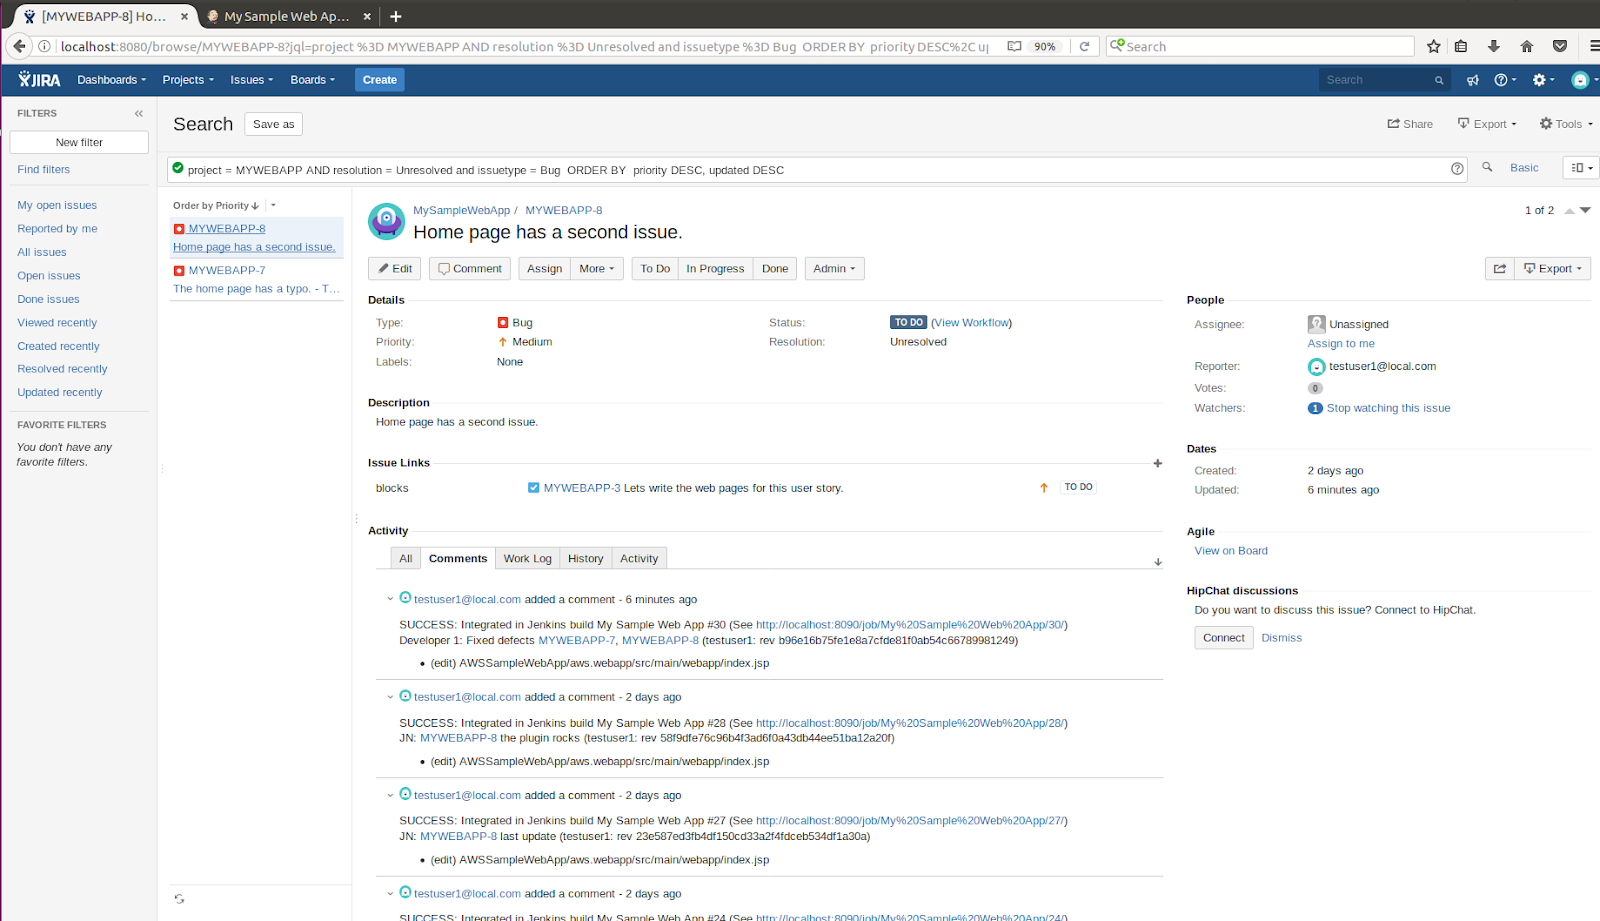
Defects/Bugs
By default Jira template for Scrum comes with predefined Issue Types – Epic, User Story, Task, Bug and Sub-Task. Jira also allows you to define your own custom “Issue Types” and “Sub-Tasks”. I prefer to define a custom Sub-Tasks called “Defect” and use that to assign the same as a “Sub-Task” to user stories within a sprint to actively fix defects/bugs while the sprint is active. I do not provide any estimates for this Sub-Task because it’s a defect found while the sprint is active and needs to be fixed before the User Story is said to be “DONE” for the sprint and therefore there is no point in estimating or tracking work efforts for the same. Another benefit of not providing any estimates is that then this sub-task when added to the user story in an active sprint will not be considered as a “Scope” creep change by Jira, which it isn’t.

I use the predefined Issue Type – “Bug” to track real defects/bugs that are identified after the sprint is completed and a code release has occurred. I use “Bug” – Issue Type as priority one backlogs for my next sprint so those defects/bugs get addressed first in the following sprint before any new User Stories are considered for the following sprint execution work load.
Measure & Monitor Work Progress
In this section I am going to explain what Project Manager, Scrum Master and Product Owners can do while the team is working and we are playing “Golf” (he-he) and proactively assisting the team in completing the active sprint on time. Within Jira following are few out of the box reports that can help you with that
  • Burndown Chart
  • Cumulative Flow Diagram
  • Sprint Report
  • Velocity Chart
Before I explain the use of each report, a few things that you need to be aware of within Jira. Jira allows you to configure “Estimation” and “Tracking” separately.
Both “Estimation” and “Tracking” can be configured to use “Time”, which is the old school way of doing project management. When I use the term “Time” in this context it means using the typical metrics - “estimated hours, remaining hours, actual hours” to measure work progress.
I like to use “Story Points” for “Estimation” and “Time” for tracking. What I mean by that is within a Sprint I use “Story Points” to track which User Story when complete is going to allow me to collect the “Story Point” assigned to it. This approach of measuring progress is better for “Estimation” than using the typical “estimated hours, remaining hours, actual hours” approach which sometimes can be misinterpreted by the team as micro-management, and I personally feel for Agile methodology is unnecessary as a typical “Sprint” spans for 2-3 weeks and we will know fairly quickly if we are productive (right). I like to start sprints with shorter spans (2 weeks) at the onset of the project since the team needs to get comfortable with each other and the work at hand as well as understand the Agile (Scrum) process. Depending on the first Sprint experience (retrospection), I try to increase the span to 3 weeks after that. So basically if you feel the progress is not at the velocity you expect, then rather than relying on old school way of actively tracking progress using “Time”, I suggest decrease the Sprint time span to take corrective action. It’s possible that the team is being asked to do more than they can handle.
Within Jira, “Time” tracking is disabled for Scrum template by default as Jira is also going with the same philosophical principle explained in the earlier paragraphs by me, adjust Sprint duration to take corrective action. With that said, I tend to use “Time” (estimated hours, remaining hours, actual hours) for tracking active Sprint progress in real time. But, I make it clear to the team that that is truly a way for the team to know what is left on their plate to do and less for me to track their work as I have the “Story Point” approach to do the same. When you set that expectations upfront with the team, then the metrics used for tracking with “Time” becomes easier to fill during Sprint planning(otherwise you end up with the usual hum…, silence…, maybe…, not sure…. type of responses when you ask for estimation hours). Following are the three metrics that you need to be aware of when you enable “Time” for tracking within Jira
  • Original Time Estimate
This field is used to do original estimation of work during sprint planning. Again as I mentioned earlier in Agile (Scrum) given that the Sprint duration is short you as a Project Manager/Scrum Master/Product Owner have to focus on the Story Point and not time management with these fields like you do with typical Waterfall type of projects (in Waterfall you tend to do earned-value analysis a lot).
  • Remaining Estimate – This is just “Original Time Estimate” minus “Time Spent” and is not filled in by the team but is auto-computed by Jira as long as you are using “Time Spent” to log actual hours.
  • Time Spent – This is the field that the team members use to log work hours (actuals) during active sprint and serves the purpose for the team to know what is left on their “TODO” list each day.
The reports that I mentioned earlier will show data differently based on how you configured “Estimation” and “Tracking” setting within Jira. Within this blog unless mentioned otherwise, I am going to go with “Story Points” for “Estimation” and “Time” for tracking which when enabled activates the above three mentioned metrics.
NOTE: Within Jira Issue screen, if the above three fields are not visible then you can make them visible by configuring the User Interface Schema within Jira for Issue screen (within Jira look for pre-defined fields – “Time Tracking” and “Log Work” and add them to the Issue Screen so that the fields are visible on that screen).
In the rest of this section I will provide a brief overview of how each report mentioned earlier can be used along with the metrics to help you track and monitor work progress.

Burndown Chart
This chart helps you understand at what rate are you collecting “Story Points” between Sprints and if required whether you need to adjust your sprint workload for the next sprint to take corrective action. The report is called “Burndown” due to the fact that as you collect Story Points during an active Sprint, the remaining Story Points available for collection decreases until it becomes zero while you are actively collecting them by completing the User Stories.

As shown in the above Burndown chart for my “MyWebApp”, I had one User Story to complete for my Sprint 4 and I did not complete the same within time, the grey line shows when I should have collected the User Story Point and the red line shows the actual. In a perfect world you should try to be as close as you can get to the grey line in terms of you Burndown rate.

Cumulative Flow Diagram
This Report is very useful as it gives a Cumulative flow of various Categories (To Do, In Progress, Done) within the “Issue Types” you are using in Jira. Within Jira (Scrum), the Issue Types that are applicable to use include - Epic, User Story, Task, Sub-Task, and Bug/Defect and the default Categories are - To Do, In Progress, Done.
This report helps you identify potential bottlenecks within the active sprint, as the name (Cumulative flow) suggest, during an active Sprint you should observe the “Done” flow color increasing at the same rate as the “In Progress” flow color decreases which tells you that the team is getting their work done as days progress.
NOTE: You can certainly add your own custom statuses (like QA) and those will add up in this report under one of the three pre-defined non-configurable Jira categories (To Do, In Progress, Done). Jira allows you to add custom Statuses (like QA) but does not allow you to add custom Categories, all statuses need to be clubbed under one of the following three categories - To Do, In Progress, Done. And the cumulative flow diagram shows color coding of the categories not statuses under each of the three categories.

The above screen print provides a sample overview of how my “MyWebApp” projects Cumulative flow looks like. Seems like I am getting a lot of things done (shown by the lack of “Orange”/“Green” and abundance of “Purple” color in the chart especially towards the end of the time period)
Sprint Report
This is the report that helps you actively monitor the progress during a sprint and is one of the reports that you should be actively looking at during the sprint duration. The report shows three color coded lines – “Grey” line is the ideal way in which your project should progress (run) during a sprint. The “Red” line shows you how much of your estimated hours are left to complete (this line is shown if you have enabled “Time” for tracking) and the “Green” shows the actual hours logged if your developers are entering their actual hours (Time Spent) while working during a sprint (again this line is shown if you have enabled “Time” for tracking). You can use this report to tell if your team has over commitment for the active sprint and can take corrective action accordingly.

 The above screen print shows the Sprint Report for “Sprint 4” of my “MyWebApp” project. Looking at the report it seems like my team was overcommitted for that Sprint cycle.

Velocity Chart
As the name suggest the Velocity chart shows you the relative velocity of your project from sprint to sprint. Gives you an idea of how well your overall project is progressing. This uses the “Story Points” that you assign to User Stories to show you the relative velocity across Sprints. You only collect Story Points for completed User Stories


The above screen print shows the Velocity Report for my “MyWebApp” project. It seems like I am collecting all Story points from sprint to sprint so my project health looks all right (not sure if my team is getting burned with over commitment but this report makes me feel good until I look at the “Sprint” Report, man the team is over committed, need to do something about it).
Note: For the first two sprints in the Velocity chart you do not see the “Grey” bar because I started those sprints before I gave Story Point estimates for Use Stories and Jira does not like that and hence does not show me the relative estimated Story Point “Grey” bar for the first two sprints.

Hybrid Approach

Hybrid approach of project management is what I recommend you use for large scale projects where you have external facing customers where typically scope changes are wrapped around legal firewalls. As shown in the diagram, you can use Waterfall model as an umbrella framework for external customers and follow all the PMI-PMBOK recommended processes and Knowledge Areas to provide deliverables and continue to use Agile methodology with your internal team for Software/Product development (Feature driven methodology).

Conclusion
I hope this blog will help you plan, execute and monitor your next project better and help you to use Agile (Scrum) within that project. Hopefully I will get time to write about Earned Value Analysis technique in my next blog.
NOTE: I hope to find time to write about Earned Value Analysis technique in my next blog and how you do that in a typical Waterfall style (PMI-PMBOK) project using Microsoft Project as a software tool for the same.

Wednesday, March 1, 2017

Application Lifecycle Management (ALM)/ Continuous Integration (CI)

Introduction
In this article I plan to describe how to go about doing Application Lifecycle Management (ALM) using open source or economically feasible software that you can afford to justify to your management. I will start with a 10,000 feet high level overview and then deep dive into installation and execution of the various elements that are used to make ALM and Continuous Integration a reality with minimal project cost.

Architectural Overview
In the following section I plan to show how to configure the various pieces of the software mentioned in the above Architectural Diagram to provide an ALM/CI experience. In a nutshell, I am using Jenkins to be the middle-man to connect all the dots here. Jenkins has plugins to download my “Sample Web App” (written in Java) from the Source Code Management repository – Git. Jenkins has plugins to integrate with Maven the source code built software, it has plugins to integrate with Jira the ALM software that is using Scrum methodology for project management. So basically the end-to-end user experience starting from Scrum User Stories to Scrum Releases to defects to code fixes to code builds is all controlled through Jenkins automatically and the various plugins within Jenkins automatically update the respective software’s proving the ALM/CI experience and most importantly the end-to-end visibility to all stakeholders.
Development Environment
I plan to use the following technology stack for ALM/CI
  • Java/Spring Framework/Hibernate/MySQL
  • IDE: Eclipse
  • Web/Application Server: Tomcat
  • Code built software: maven (you can also use Gradle)
  • Operating System (OS): Ubuntu
  • Virtualization software: VMWare workstation for Virtual Machines (VM)
  • Built Software: Jenkins
  • Source Control Management (SCM) software: Git/Apache server
  • ALM software: Jira (I am using Jira but if you are looking for an open source ALM software that’s free try  - Tuleap)
Order of installation
  1. We will start with “General Software Installation” section first
  • Create a Ubuntu VM
  • Install Java JDK
  • Install eclipse
  • Install Maven
  1. Git/Apache
  2. Jenkins
  3. Sample Web App
  • Add the sample web app to Git repository
  • Install tomcat
  • Import the sample web app into eclipse by pointing to local Git repository
  1. MySQL
  2. Jira


General Software Installation
Step1: Create a VM in VMWare workstation that uses Ubuntu OS
Download the latest ISO image for Ubuntu by going to following link: https://www.ubuntu.com/download
After downloading the same, use VMWare workstation to install Ubuntu as a VM. For the purpose of this blog, I am going to install the Ubuntu Desktop edition but will use terminal console commands most of the times to show how the server components can be installed in Ubuntu server OS where you do not have a graphical interface.
Step2: Install Java JDK
In console use the following command to install Java JDK
apt-get install default-jdk
This will install the latest Java JDK from the Ubuntu managed repository. If you want to use Oracle JDK then you will either have to install it manually or go for some PPA (Personal Package Archives). I suggest go with what Ubuntu gives you unless you want the latest greatest and if you do then I suggest going with manual installation versus relying on some third-party PPA. However remember manual installation means you need to ask the Unix/Linux administrator to document every step before he/she does it so that the documentation lives beyond the project dependency on that single person.
Step3: Install eclipse
I am going to do a manual installation for eclipse as the one that comes with apt-get repository is a very old version of eclipse IDE.
NOTE: You need at least 2GB RAM for running eclipse on an Ubuntu VM
Step3a
Go to - http://www.eclipse.org/ and download the tar for “Eclipse IDE for Java EE Developers”
Step3b
Untar the downloaded file using the following command in your temporary folder (my temporary folder is /mysoftwares)
tar -xvf eclipse-jee-neon-2-linux-gtk-x86_64.tar.gz
Step3c
Move the untar folder to /opt folder using the following command

mv /mysoftwares/eclipse /opt/

Step3d
That’s pretty much the installation, what I am doing next is to create shortcuts in desktop for launching eclipse as shown below

  • First create a /mysoftwares/eclipse.desktop file with contents as shown below

[Desktop Entry]
Name=Eclipse
Type=Application
Exec=eclipse
Terminal=false
Icon=eclipse
Comment=Integrated Development Environment
NoDisplay=false
Categories=Development;IDE;
Name[en]=Eclipse

  • Next use the following command to install the desktop shortcut for eclipse

sudo desktop-file-install /mysoftwares/eclipse.desktop

  • Now copy the eclipse icon using the following command to allow the eclipse icon to be displayed from the start tray on left side within Ubuntu Desktop

sudo cp /opt/eclipse/icon.xpm /usr/share/pixmaps/eclipse.xpm   

  • Now let’s create a symbolic link to “/opt/eclipse/eclipse” so the desktop shortcut can launch the eclipse IDE

sudo ln -s /opt/eclipse/eclipse /usr/local/bin/eclipse

The /usr/local/bin is in PATH of user account hence the symbolic link works.
Step4: Install maven
I am using maven to do source code built. If you want to use Gradle you can. Both have their pros and cons. I always say the same thing when it comes to technology shifts, “Flavor of the day” is different. I tend to focus on the ice cream.
Use the following command to install maven
sudo apt-get  install maven

Git/Apache
Step1 – Install Apache
I plan to use Apache web server to serve my private Git repository over http. I want to do this versus using github so I can control the code repository for our projects.
To install Apache just use the following command
sudo apt install apache2

I plan to use the default DocumentRoot folder (/var/www/html) of the default website to create the raw Git repository base
Step2 – Install Git
Step2a
Let’s install Git using the following command
sudo apt install git
Step2b
Let’s create a folder under DocumentRoot folder (/var/www/html)
mkdir myprojects.git
Step2c
Now let’s change the group to be www-data (the apache group) so that apache can read and write to folders and files inside this folder. The “myprojects.git” is the root folder of your local Git repository on the server-side
chgrp -R  www-data /var/www/html/myprojects.git
Step2d
Now also set the gid bit using the following command
chmod g+s /var/www/html/myprojects.git
This command will set the gid bit – special bit so any folders and files created in /var/www/html/myprojects.Git folder will have group “www-data” as the group owner
Step2e
Let’s create bare repository using the following command under the folder (/var/www/html/myprojects.git)
Git init --bare –shared
This command sets the folder (/var/www/html/myprojects.git) to be the root folder for Git on the server-side.
Step2f
Now we need to allow apache to render files and folders under folder (/var/www/html/myprojects.git) to be served to the client-side software of the git. Let’s start with enabling some modules that we will need for the same using the following command
a2enmod cgi alias env rewrite
Step2g
Now we need to enable push from Git server-side using the following command
Git config http.receivepack true
The above is needed to allow push; clone is enabled by Git by default but not push. Run this command from the Git root folder which is the folder (/var/www/html/myprojects.git)
Step2h
Now update the default site configuration file (/etc/apache2/sites-enabled/gedit 000-default.conf) to allow CGI script running from the DocumentRoot folder (“/var/www/html/”) as shown below

SetEnv GIT_PROJECT_ROOT /var/www/html/
SetEnv GIT_HTTP_EXPORT_ALL
ScriptAlias /myprojects.git/git/ /usr/lib/git-core/git-http-backend/
           Options ExecCGI MultiViews SymLinksIfOwnerMatch
           AllowOverride None
          Require all granted
        Options -Indexes
Step2i
That’s pretty much it now you can access the private local Git repository on the client side using the following commands on the developer’s workstation

Git config --global user.name "testuser1"
Git config --global user.email "testuser1@local.com"
Git clone http://localhost/myprojects.git/git/myprojects.git
cd myprojects
echo "sample file to create master branch" > mysamplefile.txt
Git add mysamplefile.txt
Git commit -m "Adding start text file - to create master branch"
Git push origin master

Jenkins
Installing Jenkins is pretty straight forward, go to following link to get the installation steps - https://wiki.jenkins-ci.org/display/JENKINS/Installing+Jenkins+on+Ubuntu

Basically what we are doing above is adding Jenkins package repository to the Ubuntu apt “sources.list” file so we can then use apt-get to install and update Jenkins using Jenkins package repository (this is basically the PPA maintained by Jenkins)
If you want to change the port on which Jenkins web server listens on, you can edit the “/etc/default/ Jenkins” file to change the same.
I have installed Jenkins on a different Ubuntu VM that will serve as a built server for multiple projects. Following things need to be installed on that machine
Step1:
Java JDK/Maven
Refer to “General Software Installation” section for installation steps
Step2:
Git application (you need this to get the source code from Git repository on the remote “git” server

Refer to “General Software Installation” section for installation steps

Step3:
Git plugins needed for Jenkins
When you access Jenkins for the first time you can pick select recommended plugins option, that option will automatically install the Git plugin.

Step4:
Maven plugin
You can go to “Manage Jenkins” – “Manage plugins” to install the “Maven integration plugin” as shown below


Step5:
Now let’s create a Maven built job as shown below
Step6:
Let’s point to the Git repository that I have on the other Ubuntu VM so we can download the source code and built the war file using maven. The details are shown below


The URL: http://192.168.164.180/myprojects.git/git/myprojects.git is pointing to the other VM where I have installed git/apache as well as tomcat application server

Step7:
You also need to provide relative path to pom.xml if that file is not in the root which is the case for me as I have multiple projects in central Git repository with each folder representing separate projects. So provide a relative path to pom.xml as shown below


Step8:
Now let’s configure the path to maven on the built server by doing the global configuration in Jenkins as shown below (use mvn –v to know what the maven home folder is on your machine)

Step9:
Now all you need to do is click the “Built Now” link to build the sample Maven Built Job “My Sample Web App” as shown below

Step10:
The screen print below shows the console log of a successful built. By default the workspace for Jenkins in Ubuntu is in (“/var/lib/jenkins/workspace/”) folder and then there are sub folder (“/var/lib/jenkins/workspace/My Sample Web App”) for each job in it where the built occurs


Step11:
Now we need to upload the war file generated for the “My Sample Web App” Jenkins built job as a post step. There are three ways to do that
Option1a:
Use the Maven plug-ins provided by apache tomcat for Jenkins: http://tomcat.apache.org/maven-plugin-2.2/
Option1a-step1:
Let’s first start by changing the “pom.xml” file in your “Sample Web App” to use the Apache tomcat plugin as shown below
Option1a-step2:
We are referencing a lookup value “TomcatServer” in the above plugin section “Option1a-step1”, the actual details are stored in maven’s “/usr/share/maven/conf/settings.xml” file so we need to include the tomcat authentication details in that file to abstract the username and password from the project specific file (“pom.xml”).
For eclipse IDE, as I am using an embedded maven plugin provided by eclipse instead of the installed software; the settings.xml file is typically copied from “/usr/share/maven/conf/settings.xml” to the “~/.m2” folder and eclipse maven plugin looks at that location. So to compile my code I need to make changes to “~/.m2/settings.xml” file and then on the built Jenkins server where I have only installed maven software (no eclipse IDE) I need to do it at “/usr/share/maven/conf/settings.xml”.
NOTE: Instead of using the maven plugin in eclipse IDE, it’s possible to configure eclipse to use the installed maven software on the machine thereby making eclipse reference the same “settings.xml” file used by the maven software installed. Since you are copying the file from “/usr/share/maven/conf/settings.xml” to the “~/.m2” folder of the developers login profile make sure that the “~/.m2/settings.xml” file owner and group is that of the developers login ID (“testuser1” in my case), otherwise the eclipse IDE which runs under that users security credentials will not be able to read the “~/.m2/settings.xml” file

The changes to “settings.xml” file are the same and are shown below (password is masked by me for obvious reasons)
Option1a-step3:
Now we need to configure the “tomcat” user in “/opt/tomcat/conf/tomcat-users.xml” file to allow Jenkins to use that account to upload the generated war file to tomcat using the tomcat deploy URL: http://192.168.164.180:8080/manager/text (defined in pom.xml file in “Option1a-step1” section)
Option1a-step4:
Since my built server is going to be on a different Ubuntu VM than the tomcat server I will have to allow remote deployment to tomcat through the URL: http://192.168.164.180:8080/manager/text by editing the “manager” web applications “/opt/tomcat/webapps/manager/META-INF/context.xml” file as shown below
Option1a-step5:
Now all you need to do is change the maven goals within Jenkins to allow war files to be undeployed - tomcat7:undeploy  and deployed - tomcat7:deploy (you start with undeploy and then deploy so that you can repeat the builds multiple times, the first time the undeploy - tomcat7:undeploy goal will fail). The screen print below shows that change done to “My Sample Web App” Jenkins job.
NOTE: Even if the maven goals say “tomcat7:deploy” and “tomcat7:undeploy”, the same goals work for tomcat9 as well.

Option1b:
Write a post built script (shell script) that uses wget/curl command to copy the generated file from the built server workspace location “/var/lib/jenkins/workspace/My Sample Web App/AWSSampleWebApp/aws.webapp/target/aws.webapp.war” to tomcats hot deploy folder “/opt/tomcat/webapps”. This is pretty straight forward to configure and I do not plan to show the exact steps for this blog. The screen print below shows where within Jenkins you need to do the configuration and invocation of the bash script. This configuration is done at the Jenkins job configuration level “My Sample Web App” job in this case
Option1c:
Use third-party provided plugins – Example: Capitomcat: https://wiki.jenkins-ci.org/display/JENKINS/Capitomcat+Plugin
Using this plug-in is also pretty straight forward just install it in Jenkins and then follow the release notes on the above link to configure the plugin parameters and you are all set. It’s possible that other similar plug-ins are already available in the marketplace, that’s the very reason I am not elaborating these steps in this blog for ALM/CI.
Step12:
We also need to install the “Jira plugin” to allow Jenkins to update Jira comments when builds that fix defects are executed and the application with new code is deployed. This “Jira plugin” is what is going to give the end-to-end ALM experience. The installation of the plugin is pretty straight forward and details of the plugin are available on the following site link: https://wiki.jenkins-ci.org/display/JENKINS/JIRA+Plugin
Once the plugin is installed on Jenkins via the Manage Plugins screen as shown below
Note: the above screen print shows two Jira plugins, I am using “Jira plugin” in this blog. But you can also use the second plugin called “Jira Issue Updater”, the following site: https://wiki.jenkins-ci.org/display/JENKINS/Jira+Issue+Updater+Plugin has details for that plugin
The one thing you need to remember for the “Jira Issue Updater” plugin is the REST API URL for Jira is: http://localhost:8080/rest/api/2 (I am using localhost as the Jira and Jenkins software are installed on the same Ubuntu VM)
Back to the “Jira plugin” configuration, you need to perform two configuration steps as shown below for the same
Step12a:
The first configuration step is at the Global setting level within Jenkins as shown below

The above configuration needs to be done once for all Jenkins jobs. One thing to note here is the field “Issue Pattern” is empty so the default pattern will be used to match the Issue ID within Git commit messages which is -. This default “Issue Pattern” matches our two bug’s format “MYWEBAPP-7” and “MYWEBAPP-8” respectively. However if you have a different pattern than the default then this is where you configure the same at a global level.

Step12b:
Now at the individual Jenkins built level you do the following configuration

Basically I have a post built action for “My Sample Web App” Jenkins built that uses the globally configured “Issue Pattern” in “Step 12a” above to update the Comment section for the two Jira defects (“MYWEBAPP-7” and “MYWEBAPP-8”) thereby providing end-to-end visibility between code builds and defects that are being fixed by the code builds

Sample Web App
For the purpose of showing ALM, I have created a simple Java web stub. The stub is using Spring Framework to provide a MVC (Model View Controller) pattern. It’s using Hibernate as an ORM (Object Relational Mapping) to abstract the database SQL from application code. It’s using MySQL as the database server. Another reason for me to use this application architecture is so I can use the same stub to deploy code in AWS using features like AWS Beanstack, AWS Auto Scaling, AWS VPC.
Step1:
Step1a:
After creating the local developer Git repository by following the steps outlined in “Step2 – Install Git - Step 2i” section, let’s copy the sample Java Web app “AWSSampleWebApp” to the Git repository folder (/mysoftwares/dev_locrep_clientside/myprojects). After the transfer, the directory path for the “.git” folder should be: (/mysoftwares/dev_locrep_clientside/myprojects) and the project folder should be under that (/mysoftwares/dev_locrep_clientside/myprojects/AWSSampleWebApp)
Step1b:
Execute the following command to add the copied project under folder (/mysoftwares/dev_locrep_clientside/myprojects) to the staging area of your local Git repository
Git add .
Execute the above command from the (/mysoftwares/dev_locrep_clientside/myprojects) folder.
Step1c:
Next perform the first project commit to include the same to your staging local repository
Git commit -m "My project baseline commit"
Execute the above command from the (/mysoftwares/dev_locrep_clientside/myprojects) folder.
Step1d:
Now execute the following command to push and commit the local changes from staging to the central server
Git push
NOTE: If other developers have committed their code and you want to pull that code to your local repository then use the “Git pull” command for the same.
Now you have the base code in central Git repository, from this point forward you will use eclipse to create a Maven project in Java by pointing to a local Git repository and then any changes you do to the source code you will be able to use the “Git Staging” tab within eclipse to commit and push the code changes to local and central repository at the same time from eclipse IDE directly

Step2:
Let’s install tomcat to be used as an application server to deploy our sample Web application. Since we want to use the latest tomcat (version 9) with latest version of eclipse (neon), let’s manually download the file from: http://tomcat.apache.org/index.html
Step2a
Untar the file using the following command
tar -xvf apache-tomcat-9.0.0.M17.tar.gz
We need to now move all the untar files/folders under the folder (/opt/tomcat).
The folder (/opt/tomcat) has the following permissions
drwxrwxr-x  9 testuser1 testuser1 4096 Feb 21 16:21 tomcat
Step2b
Let’s create a tomcat user for the tomcat service using the following commands
sudo groupadd tomcat
sudo useradd -s /bin/false -g tomcat -d /opt/tomcat tomcat
(a shell of /bin/false means nobody can log into the account, we do that for security reasons as user “tomcat” is running as a service on the Ubuntu box)

Step2c
Now let’s give permission to the tomcat user as shown below
Give the tomcat user write access to the conf directory, and read access to the files in that directory:
sudo chgrp -R tomcat conf
sudo chmod g+rwx conf
sudo chmod g+r conf/*
sudo chown -R tomcat bin
sudo chgrp -R tomcat lib

Next, make the tomcat user the owner of the webapps, work, temp, and logs directories:
sudo chown -R tomcat webapps/ work/ temp/ logs/
Step2d
Next let’s create the tomcat.service file for the “systemd” daemon to control start/stop of tomcat service. The contents of the tomcat.service file are shown below. Make changes to the environment variable as appropriate for your environment.
Next copy the file to tomcat.service location /etc/systemd/system (you need sudo privileges to do the same).
Next, reload the systemd daemon so that it knows about our new service file:
sudo systemctl daemon-reload
Start the Tomcat service by typing:
sudo systemctl start tomcat

Step3:
Now lets try to compile the file with eclipse by pointing the eclipse to the developers local repository folder (/mysoftwares/dev_locrep_clientside) and then writing the “.gitignore” file to exclude the “target” folder from being put into repository, we do not want to version control the “target” folder as the contents of that folder can be recreated with maven build’s and there is no point in versioning the compiled and packaged code.
Let’s start by importing the project from the local Git repository. Navigate to the folder (/mysoftwares/dev_locrep_clientside), select the local Git repository and hit Finish to import the sample web project into eclipse   

The rest of the steps in eclipse code compilation will change depending on what version of eclipse you use and what libraries you use within maven. I will not explain those details in this blog as this is not a Java/Spring/Hibernate/Maven/Git/MySQL blog.

MySQL
To install MySQL use the following command
sudo apt-get install MySQL-server
I am going to create a simple database and table within MySQL which will be used by the hibernate ORM as a persistent database. I am not going to spend much time explaining the database/table part of MySQL in this blog as I want this blog to focus more on ALM aspect and continuous application development/integration process.
Jira
I am using Jira here as an economically feasible ALM software. But if you want you can also use Tuleap (which is open source) and free.
Both have plug-ins to integrate with Jenkins. These plug-ins allow us to associate the artifacts within Jira (Jira calls it issues) with builds done within Jenkins. There by providing end-to-end visibility starting from Jira all the way to code built.
I am going to use the Scrum board within Jira for Agile development (Jira out of the box provides Scrum and Kanban as two Agile templates).
Step1:
In order to install Jira you can either use the installation binary provided for supported Windows/Linux versions or download the tar file and do the installation manually.
I plan to use the binary installer provided for Linux 64bit OS (Ubuntu in my case). The steps to do the installation are pretty straight forward and are mentioned in the following site: https://confluence.atlassian.com/adminjiraserver073/installing-jira-applications-on-linux-861253030.html#InstallingJIRAapplicationsonLinux-2.Runtheinstaller
If you want to do manual installation with the tar file, use the following site link that provides installation details:
Step2:
Jira comes with a Jenkins plugin to integrate with Jenkins and Jenkins also has a Jira-plugin to do the same. I am using the later. The installation steps to do that are pretty straight forward and are mentioned in “Jenkins – Step12” section
Step3:
I used a sample Scrum template available within Jira to manage the Sample Web Application. Setting up of Scrum project is pretty straight forward. The screen print below shows the Scrum Dashboard for the “MYWEBAPP” project.  Within Jira everything is considered an “Issue Type”, to some extend that is due to the fact that Jira is more widely used as an Issue/Defect tracking software and has grown into an ALM software by providing Agile templates for Scrum/Kanban. The Scrum board shows User Stories that need to be done, Tasks associated with those User stories for the “Sample Web App” project. My current Scrum dashboard is displaying only User Stories and Task based on the filter, but it’s completely possible to customize this out of the box Scrum Dashboard to suit the needs of individual projects.

Step4:
For showing how end-to-end visibility is achieved I created two sample “bugs” in Jira for the “Sample Web App“project as shown below (MYWEBAPP-7, MYWEBAPP-8). Each “Issue Type” within Jira has a unique ID that uses the following format: -
Step5:
Let’s say the developers in the team get to work on the two defects opened in “Step4” above and fix the same and check in the code with comments like – “Developer 1: Fixed defects MYWEBAPP-7, MYWEBAPP-8” in Git. The screen print below is from eclipse IDE where the developers are entering their comments in the “Git Staging” tab within eclipse IDE

The Jira plugin within Jenkins out of the box parses the text used in Git commit and is smart enough to associate the Jenkins built with the two bugs by updating the Comments section accordingly as shown below. Both bugs comment section are automatically updated
Bug MYWEBAPP-7 comments section
Bug MYWEBAPP-8 comments section
The screen print below shows the Jenkins built log showing the two Jira defects being updated.

Conclusion
Most of the software I have explained at 10,000 feet level here is open source and free but free does not mean cheap, sometimes investing in commercially expensive alternatives like Visual Team Suites, IBM Rational products (DOORS Next Generation) is a better approach. In the end, the saying one shoe fit all strategy does not work. With that said, in my experience these products do get the job done especially for a team that is comprising of 10-15 members; the larger the team size gets its harder to use these products as one cohesive unit. For large projects if your management has the budget using commercially expensive products like Visual Team Suites, IBM Rational products (DOORS Next Generation) is a better choice as the software cost pays out in the end for time wasted in using bandages with cheaper alternatives. Hopefully I will find time to write article on IBM DOORS next generation and Visual Team Suites in the coming months. If you are in the Java band wagon using IBM DOORS next generation will be a natural platform to use than Visual Team Suites which is very much meant for Microsoft enthusiasts. For all others who have a small budget use the software’s mentioned in my blog and you should be equally as productive with your ALM/CI experience.