My "todo" List

I am planning to write some blogs at somepoint of time in the future on the following topics:

Spring Framework, Hibernate, ADO.NET Entity Framework, WPF, SharePoint, WCF, Whats new in Jave EE6, Whats new in Oracle 11G, TFS, FileNet, OnBase, Lombardi BPMS, Microsoft Solution Framework (MSF), Agile development, RUP ..................... the list goes on


I am currently working on writing the following blog

Rational Unified Process (RUP) and Rational Method Composer (RMC)

Friday, June 8, 2018

Scaled Agile, SAFe framework and TFS (VSTS) use for the same

Introduction
In this article I plan to describe how you can use Team Foundation Server (TFS) or Visual Studio Team Service (VSTS) to be Agile in a large scale project with multiple teams working in parallel. I plan to use Scrum terminology a lot in this article and if you are unfamiliar with Scrum then I suggest you read my article on Scrum at: https://www.linkedin.com/post/edit/project-management-using-jira-agile-scrum-jayesh-nazre . In that article I start with describing the terms used in Scrum and then use Jira’s Scrum template to explain how you can be Agile using a “fictitious web based application” project as an example. In this article I will use SAFe (scaled agile) framework and explain how TFS can be configured to use SAFe framework for a large team project. I am going to assume that you are familiar with Scrum terms for the remainder of this article.

I am also not going to spend much time providing an overview of SAFe framework in this article as I believe the following website provides a very useful interactive user interface to understand what SAFe framework is https://www.scaledagileframework.com/
Architectural Overview
A few observation points about the above diagram
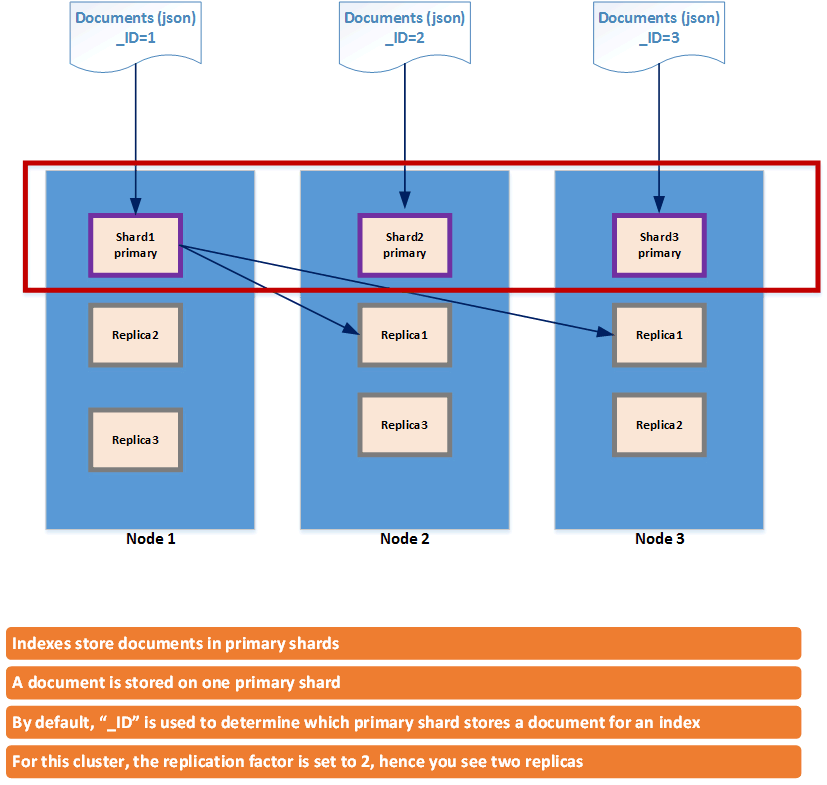
The above diagram is providing a simplified overview of SAFe Framework. The color coding is used by me to help visualize how work gets decomposed from top to bottom. Typically you start with “Epics” in the Portfolio management layer, which is then decomposed into “Features” at the Program management layer which then gets decomposed into “Product Backlog Items (PBI)/User Stories (US)” at the Team level. In TFS/VSTS, there are different templates available when you set up a Team Project. Depending on which template you pick you will get a set of predefined work items. For example in Agile template you get User Stories and in Scrum template you get Product Backlog Items. I am going to use the PBI/US interchangeably within this article. Also unless mentioned otherwise whatever I say for TFS is also applicable for VSTS. Within TFS, the term “Work Item Type (WIT)” is used as a generic term to mean any of the following – Epics, Features, User Stories, Product Backlog item, Tasks, Bugs etc. Depending on which template you select some of the WIT will be available automatically to you within the project. For Example, if you use “Scrum” template following WIT will be made available automatically – Epic, Feature, Product Backlog Item, Task, Impediment and Bug. Instead of Scrum, if you select “Agile” template then following WIT will be made available automatically to you – Epic, Feature, User Story, Task, Issue and Bug.
At the Team level:
In Scrum, you start work by picking work items from the “Team backlog”, into the next sprint during “Sprint Planning”. A Sprint typically runs for 2 weeks (it can run for 3-4 weeks).
At the Program level:
You start with Program Increments (PI) which typically run for 10 weeks. Each iteration within PI is called a Cadence which typically lines up with a single Sprint duration of 2 weeks. The First Cadence is when you do PI planning and the last Cadence is when you do Innovation and Planning. As you can see in the diagram, the framework at the program level aligns with the framework at the Project team level to provide scaling, For Example:
  • You do Sprint Planning at the beginning and you do PI Planning at the beginning of PI
  • You do Sprint Retrospection at the end of the Sprint and you do Innovation and Planning at the end of PI.
At the Portfolio level:
This is where strategy and investment funding are defined for value streams and their Solutions. The portfolio level aligns enterprise strategy to portfolio execution by organizing the lean agile enterprise around the flow of value through one or more value streams. TFS has limited capability to address all aspects of Enterprise Agile Management and Value Stream Management. VersionOne (now Collabnet) is a better software to provide you with the SAFe framework experience than TFS at this level. Within TFS, at this level you have the capability of using Kanban Board just like you do at other levels to define, prioritize, execute and monitor work progress (The Kanban board uses Epics at Portfolio level, Features at Program Level and PBI/US at Team level as show in the diagram). TFS also allows you to use “tags” as a quick and easy way to map Epics to their Value Streams, strategic themes, and associated budgets. But the capability TFS provides is by no means close to what Versionone provides.

Some of the things that I have not shown in the above diagram and is worth mentioning is that Continuous Integration/Continuous Deployment (or Delivery) (CI/CD) and Release Management is also something that needs to occur at the Program/Team level and automating that is what provides agility. TFS provides CI/CD and Release Management capability. TFS allows source code versioning through Team Foundation Version Control (TFVC) or Git. Within SAFe Framework, Agile Release Train (ART) is a team of individuals whose goal is to work towards Feature release automation at the program level. Similar automation is also done at the Project Team level but is restricted to Sprint release automation. Typically System demos are events that are organized throughout the PI duration where multiple teams demo what Features are “release ready” and allow teams to collaborate and receive feedback from sponsors, stakeholders, and customers. A similar demo event is done at the Project Team Level at the end of each Sprint.
TFS/VSTS configuration
The above picture provides an example of how a fictitious project – “CRMProject” is decomposed into different levels within TFS/VSTS.
A few observation points about the above diagram
The above backlog view is visible to all Portfolio level users and is providing a drill down visibility to Portfolio users.
Points 1 through 4:  
These points provide a drilldown detail view of which Epics are associated with Features which in turn are associated with PBI which in turn are associated with Tasks providing a top down visibility. It’s possible to control what is accessible to users at what level depending on which TFS groups the TFS teams are assigned to. Within TFS access security controls are enforced through TFS groups, TFS teams and associating users to TFS teams.
Point 5:
Within TFS, Area paths is how you control which TFS team can add which WIT and which TFS teams/TFS groups have access to each Area Path to do the same. This is how TFS allows you to create the top-down hierarchy (Epic to Feature to PBI to Task).
Point 6 and 7:Value Area's along with "Tags" can be used to map Value Streams, strategic themes, and associated budgets to "Epic" - "Feature" - PBI/US. Within TFS, you can define search queries that filter WIT based on "Tags" and share the Query results across teams.

In order to do “PI” at the program level and Sprints at the Team level within TFS you configure the iterations for the project as shown below
Once the iterations are configured as shown in the above hierarchy. You can assign Sprint iterations to multiple teams as shown below


TFS/VSTS Build and Release Management
The above diagram provides a high level overview of Continuous Integration/Continuous Deploy/Delivery (CI/CD) pipeline capability of TFS/VSTS.
A few observation points about the above diagram
TFS provides complete end to end visibility where in you can associate WIT (like Epics, Features, PBI/US, Bugs) to code checked into the TFVC/GIt at the time of checking in the code. You can also trigger automatic build process based on code check-in event (For example checking in code in “Release” branch in Git). You can also use Gated check-in build with TFVC “only” where in successful build of code before checking it in is mandated. The above diagram shows how Agile Release Train (ART) can be realized through CI/CD pipelines to deliver Features to the customers in continuous manner there by providing value. It’s possible during Release management for an approval workflow to be enabled so releases into production environments can be controlled via a human interaction (an approver). Releases can also be initiated based on triggers like checking in code into a specific Release branch, successful release of code in one environment triggering another environment’s release or doing manual releases.

One of the things that I have not shown in the above diagram is that it’s possible to run automatic tests from Test plans as well as run Unit test on application code that’s being built.
A few take away
  • SAFe framework and Scrum of Scrums (SoS) are two different things. Scrum of Scrums (also called Meta Scrum) is defined by the Agile Alliance as “A technique to scale Scrum up to large groups”, SAFe, on the other hand, is a complete framework. Put differently, SAFe is prescriptive via its framework, SoS is more of using best practices from Scrum and scaling it to a larger team but is not a very prescriptive approach and assumes that teams are mature enough to scale and be agile.
  • Do not try to use SAFe to manage a project with waterfall mind set. That will defeat the purpose of why Agile frameworks exist. The idea is to change the mindset not replace waterfall with another methodology which will end in having the same results as a waterfall model does.
  • Although I am showing how to use TFS/VSTS to scale Scrum/Agile projects using SAFe framework. You can also use other software’s like – VersionOne, Jira to do similar scaling. With Jira you can use the BigPicture plug-in to incorporate the SAFe framework within Jira as out of the box Jira does not provide SAFe framework configuration. VersionOne and Jira (with BigPicture) is also a good alternative if you are a non-Microsoft shop.
Conclusion
I hope this helps you understand how to scale Agile/Scrum methodology for large projects using TFS/VSTS and SAFe framework.

Thursday, May 24, 2018

Salesforce CRM

Introduction
In this article I plan to provide a high-level overview of the three main modules (Salesforce calls them clouds) of Salesforce CRM and then proceed to explain the key entities (Salesforce calls them Objects) that play a crucial role in each of the three clouds. I will then end the article by providing analysis in assisting you with your make-or-buy decision.
Architectural Overview
Salesforce has three main modules - Sales cloud, Marketing Cloud and Service Cloud. There are many other modules (clouds) available from Salesforce but the most widely used one is “Sales” cloud. Salesforce also provides Platform as a Service (PaaS) thought Force.com and Heroku, the latter is a company it acquired. Force.com is the platform on which all clouds (modules) of Salesforce are build. Heroku is a true PaaS that allows developers to deploy their applications written in languages like Node, Ruby, Java, PHP, Python, Go, Scala, or Clojure into its managed containers without worrying about the underlying infrastructure.

NOTE: The reason I call Heroku a “true” PaaS is because Force.com is useful for Salesforce cloud customization and everything Salesforce related. Heroku is not.

The Force.com platform has gone through some architectural changes from its “Classic” version to its “Lightning” version. As shown in the diagram, in the classic model, Salesforce used a Model View Controller (MVC) pattern to allow custom web pages to be built utilizing Visualforce, Apex classes and Salesforce objects. The design was more page centric, later they came up with a component centric design approach and gave a new fancy word to it called “Lightning”. This approach is basically based on Model Controller-Controller View (MCCV) pattern. The component centric approach allowed the same component to be reused across multiple pages. In Lightning, as shown in the diagram there are two controllers one on the client-side (written in JavaScript) and another on the server side (written in Java like language - apex classes). The latter is your classic style controller. Having two controllers allows Salesforce to change the client-side framework independently of the server-side framework and utilize SOAP/REST API for exchanging data, thereby providing architectural decoupling. Since the data exchange occurs behind the scene the user interface is not rendered on browser or phone “apps” every time an action is performed by the user on the screen there by providing a more responsive UI experience (hence the term Lightning, which by the way is what any Single Page Application framework does)
Key Objects in Salesforce CRM

A few observation points about the above diagram

The CRM process flow shown in the diagram provides you with key Objects that are heavily used within Sales and Marketing cloud. There is a lot of functionality overlap between the two and as such Marketing and Sales go hand in glove in any organization so its obvious Salesforce ended up with overlaps as well. The blue arrow flow in the diagram is my way of showing how the process flows in a CRM application, which is
  • We start with Campaigns – like trade shows, email reach out, Webinars etc.
  • These Campaigns may result in potential Leads
  • Some Leads will get converted to Opportunities and when that conversion occurs you can create other entities like Contacts, Accounts etc.
  • When Opportunities are won, you can create Contracts
The above bullet points is pretty much the meat of the two clouds (Sales and Marketing)

The Service cloud is typically used for IT service management (ITSM) and provides capabilities like
  • Opening a Case
  • Tracking the various stages a case goes through until it’s resolved.
  • Using Solutions (with Classic) or Knowledge Objects to categorize resolutions and Issue/Article types which can then be used by your help desk staff personnel’s for resolving similar Incidents in future, basically to provide a Knowledge base. You can then use the Knowledge base like a “google” Help Desk search engine.
NOTE: Coming from object oriented and database designing world, I am uncomfortable calling Entities and Classes as “Objects”. In my mind, objects are class instances but Salesforce uses the term Objects to mean Entities and Classes.
Make-or-Buy Analysis
The above flowchart will help you determine when you should use any CRM system like Salesforce as a SaaS versus building it from ground up.

A few observation points about the above flowchart while you decide which way to go

If you are a small size company that does not plan to use developers in the long run beyond the initial setup phase then you should go for Salesforce CRM or any other competing SaaS CRM software. When you do go in that direction make sure that you do not customize the CRM software using programming capabilities of the software, instead try to customize through configuration (declarative) changes provided by the Salesforce Admin pages (Setup), so basically what I am saying is use things like Validation Rules, Page Layouts, Profiles, Workflow Rules (for classic), Process Builder (for Lightning), Approval process etc. versus custom coding with Visualforce, Apex Classes, Triggers, Controllers etc. In a nutshell, try to change the business processes in your company to adapt to what Salesforce provides out of the box without having a need to custom code. Do not do custom code - just speak with other people about their painful experiences (cost wise) in converting Classic-style custom code to Lightning-style equivalent. By avoiding custom code to begin with, such drastic changes done by Salesforce will have minimal to no impact on your migration path thereby avoiding the need to have developers.

NOTE: With classic you will typically need developers who come from Java/JEE background. For Lightning you will need developers with Java/JEE background as well as developers who are very good with JavaScript. So you see how this defeats the purpose of SaaS. Especially for a small sized company. Hence I suggest no custom coding.
If you find yourself using developers to constantly tweak the salesforce platform using custom coding options (like Apex classes, Controllers, Visualforce, Lightning App Builder etc.) provided by Salesforce then I truly believe you are better off custom building your own CRM application that will save you money in the long run and here is why –
  • Physical datacenters are disappearing and are getting substituted with  Cloud providers like AWS, Azure, GCP and each of these cloud providers provide Infrastructure As Code (IaC) capabilities that allow you to build data centers in a matter of minutes using templates. Point is – it’s much easier for companies to manage data centers these days with IaaS than it was in the past
  • Salesforce is heavily Java like in terms of its custom coding capabilities and you will end up with Java developers working for your company if you do too much customization to the Salesforce platform. So why not ask the Java developers to build your CRM, you saw how simple the CRM process flow is in my earlier “Key Objects in Salesforce CRM” section, I believe you can built your own CRM with a team of 3-5 developers within 6-8 months’ time period (or at least get most of the functionality built). 
  • Salesforce uses MVC pattern for classic version and MCCV pattern in Lightning. Both these patterns are widely used in software designing. They are primarily used to avoid ripple effects from changes in any of the three layers - the Presentation (View) layer, Business (Application) Layer and Data (Database) layer. These patterns are also widely used in modern day application programming languages/frameworks like ASP.NET MVC (C#), Java (JEE), Django (Python), Ruby on Rails, NodeJS etc. 
  • There are many UX/UI application frameworks (React/Redux, AngularJS, Ember, Meteor, Vue etc.) that allow you to build Single Page web applications in shorter time period than before. My point is – application development is not how it used to be in the “dotcom” era, a lot has changed over the years and rapid application development is truly possible these days with advancements made in software development and more specifically these application frameworks are becoming more stable and mature as time goes by.
  • With cloud providers giving NoSQL services (like DynamoDB, Azure Cosmos DB, Cloud Bigtable, Cloud Datastore), managed relational services (like RDS, Redshift, SQL Database, SQL Data Warehouse, Cloud SQL, BigQuery) and Big data services (like EMR, HDInsight, Cloud Dataproc) it’s easier than before to manage and scale data.
  • The technology you pick behind your custom built CRM application framework changes at a faster pace than Salesforce and you will be able to perform upgrades much faster than Salesforce giving you the competitive edge over others who are using Salesforce for their CRM platform – very key differentiating factor to win new customers. 

Conclusion

I hope this article was helpful. My intent in the Make-or-Buy analysis section was to convey the point that if you use a CRM software “as is” with no custom coding then you get the biggest return for your investment otherwise you are better off with home grown equivalent.

Saturday, April 21, 2018

Internet of Things (IoT), AWS & Raspberry Pi3

Introduction
In this article I plan to describe how you can use Raspberry Pi3 as a Single Board Computer (SBC) to read temperature and humidity through DHT11 sensor and use AWS IoT as the MQTT message broker to send the data to AWS for further analysis.
Architectural Overview
In the architectural diagram above the arrows are showing a flow of events with numbers used to explain the order in which these events occur.
Point1:
This is the Raspberry Pi3 circuit that is generating sensor data. I did not use a microcontroller here to make things easy for me.
Point2:
AWS IoT is being used as a Message Broker to collect device data. Although I am using AWS IoT here, other cloud providers like Azure’s IoT Hub or Google’s Cloud IoT will work as well. If you do not want to use a cloud provider and want to have a self-hosted MQTT message broker you can use Eclipse Mosquitto. All these providers support MQTT protocol which is the protocol I plan to use with Raspberry Pi3. Other protocols are also supported by cloud providers but MQTT is widely accepted standard. MQTT is a publisher/subscriber messaging protocol which fits well in a disconnected architecture like IoT. Its bidirectional so you can send information/configuration instructions to devices as well.
Point3:
AWS IoT allows devices to publish to an AWS Topic. In this diagram, the device (Pi3 with DHT11 sensor) uses AWS IoT MQTT broker to send data to the topic.
Point4:
AWS allows you to define rules that can trigger actions based on data that is published by multiple devices to a specific Topic. You can define multiple rules for the same Topic.
Point5:
AWS allows multiple AWS services to be integrated with AWS IoT through the execution of actions that are run by the AWS IoT rules. In the diagram a few of the AWS services are listed, most notably - AWS Lambda, AWS DynamoDB, AWS S3, AWS SNS/SQS, AWS Kinesis (for real time streaming) and ElasticSearch. NOTE: The list is not complete
Point6:
Once the IoT device data is received at the AWS end and the appropriate AWS service is used to store the data, it’s possible to do data analysis on the same. For example: If you save the data in DynamoDB you can do data analytics using AWS QuickSight.

Raspberry Pi3 Circuit Diagram
The above diagram shows a logical circuit diagram of how Raspberry Pi3 is connected to the DHT11 temperature and humidity sensor. I am not showing the actual pin connection to keep this article simple but there is a bread board missing here which is connecting all of these components. A few observation points about the above diagram

    • On the MicroSD card of Raspberry Pi3 I have installed Raspbian Stretch Desktop OS (Debian based Linux OS)
    • I am using python libraries to communicate with GPIO pins instead of “C” program, just to make life easy for me. Basically I am using the “RPi.GPIO” libraries that come with Raspbian Stretch OS 
    • I have installed AWS CLI client on the Raspberry Pi3 to allow it to communicate with AWS IoT
    • I have installed the “AWSIoTPythonSDK.MQTTLib” python library to allow Pi3 to communicate with AWS IoT MQTT broker as a MQTT client
    • The resistors in the diagram are used to control the current flow.
    The logical flow of events is as follows

    Point 1:
    The pressing of button controls when Pi3 will read sensor data. I am using a button just to control the event flow through a user driven action. If you want you can remove the button and the LED from the above circuit and let the Pi3 read temperature and humidity at periodic intervals directly from DHT11 sensor
    Point 2:
    Once the button is pressed, I am using a LED as a visual indicator to tell me that Pi3 will be reading sensor data
    Point 3:
    The button also sends a signal to Pi3 via the GPIO pins as a trigger to read sensor data
    Point 4:
    Pi3 reads the temperature and humidity data from the DHT11 sensor once it receives the trigger from the button press event.
    Point 5:
    Pi3 then uses the “AWSIoTPythonSDK.MQTTLib” python library to send data to AWS IoT. Once the data reaches AWS IoT, then data analysis can be done from that point forward using AWS services shown in previous architectural diagram.
    A few take away
    Things you should consider exploring but is not elaborated in this article are listed below
    At the AWS end
    • It’s possible to use AWS Athena to do data analysis directly from S3 bucket
    • You can do real-time data analytics using Spark and EMR cluster of AWS and use AWS Kinesis as a streaming source which streams data from multiple IoT devices.
    • If you want to do any data transformation on the IoT data received from devices, you can consider using AWS Glue/Data pipeline.

    At the IoT end
    • You can use a Passive infrared sensor (PIR motion sensor) and connect it to Raspberry Pi3 and built your own home security system that sends you email alerts when someone enters your house or you can connect a Piezo buzzer to your Pi3 along with the motion sensor to sound an alarm
    • You can also connect a Relay to Pi3 and then use it to control pretty much anything over the web, I suggest using a smart Relay like Adafruit's “Controllable Four Outlet Power Relay Module version 2” that has an inbuilt relay so you can connect low voltage circuit like Pi3 at one end and have the power strips for high voltage at the other end to which you can connect any electrical appliance like (air conditioner, table lamp etc.). This setup will allow you to control pretty much anything in your house from anywhere over the cloud. Using a smart relay will avoid the need to work with high voltage wires and the need to connect them directly to a regular relay, safety first.
    • You can measure pressure, temperature and altitude using BMP180 digital pressure sensor that can be connected to Pi3.
    Conclusion

    I hope this gets you excited with IoT and encourages you to do some DIY projects. I have given some DIY project pointers in the “A few take away” sections in my article for you to get started on. Good luck.

    Sunday, March 18, 2018

    ELK+ Stack - Elasticsearch, Logstash (Filebeat) and Kibana

    Introduction
    In this article I will provide details of how to use the ELK+ stack for doing 
      • Full Text searching (using google type search capability)
      • Visual Data Analysis of log data generated from various sources (like server syslog, apache logs, IIS logs etc.)

        Architectural Overview

        Filebeat
        In the ELK+ stack, Filebeat provides a lightweight alternative to send log data to either the Elasticsearch directly or to Logstash for further transformation of data before its send to Elasticsearch for storage. Filebeat provides many out of the box modules to process data and these modules can be configured with minimal configuration to start shipping logs to Elasticsearch and/or Logstash. 

        Logstash
        Logstash is the log analysis platform for ELK+ stack. It can do what Filebeat does and more. It has inbuilt filters and scripting capabilities to perform analysis and transformation of data from various log sources (Filebeat being one such source) before sending information to Elasticsearch for storage. The question comes when to use Logstash versus Fliebeat. Typically you can consider Logstash as the “big daddy” for Filebeat. Logstash requires Java JVM and is a heavy weight alternative to Filebeat which requires minimal configuration in order to collect log data from client nodes. Filebeat can be used as a light weight log shipper and one of the source of data coming over to Logstash which can then act as an aggregator and perform further analysis and transformation on the data before its stored in Elasticsearch as shown below

        Elasticsearch
        Elasticsearch is the NoSQL data store for storing documents. The “term” document in Elasticsearch nomenclature means “json”- type data. Since the data is stored in “json” format, it allows a schema less layout thereby deviating from the traditional RDBMS-type of schema layouts and allowing flexibility for the json-elements to be changed with no impact on existing data. This benefit comes due to the Schema less nature of Elasticsearch data store and is not unique to Elasticsearch. DynamoDB, MongoDB, DocumentDB and many other NoSQL data stores provide similar capabilities. Elasticsearch under the hood uses Apache Lucene as the search engine for searching documents it stores in its data store.

        Data (more specifically documents) in Elasticsearch are stored in indexes which are stored in multiple shards. A document belongs to one index and one primary shard within that index. Shards allow parallel data processing for the same index. You can replicate shards across multiple replicas to provide fail-over and high availability. The diagram below shows how data is logically distributed across an Elasticsearch cluster comprising of three nodes. A node is a physical server or a virtual machine (VM)


        Kibana
        Within the ELK+ stack, the most exciting piece of the stack is the Visual Analytical tool – Kibana. Kibana allows you to do visual data analysis on data that’s stored in Elasticsearch. It allows you to visualize data by providing many visualization types as shown below
        Once you create visualizations using the above visualization types. You can create a Dashboard that can includes these visualizations on a single page to provide visual representation of data stored in Elasticsearch from different viewpoints, a technique used in Visual data analysis to identify patterns and trends within your data.

        Use Cases for ELK+ stack:
        Use Case 1
        In this use case we can use Elasticsearch to store documents to create a google type search engine within your organization. Documents referred to in this use case are Word documents, PDF documents, image documents etc. and not the json-type documents stored in Elasticsearch.


        The above diagram shows two user driven workflows in which Elasticsearch cluster is used by web applications.

        Workflow1
        Users upload the files using the Web application user interface. The web application in turn behind the scene uses the Elasticsearch API to send the files to Ingest node of Elasticsearch cluster. The web application can be written in Java (JEE), Python (Django), Ruby on Rails, PHP etc. Depending on the choice of programming language and application framework, you can pick the appropriate API l to interact with the Elasticsearch cluster.

        Workflow 2
        Users use the web application user interface to search for documents (like PDF, XLS, DOC etc.) that are ingested into the Elasticsearch cluster (via “workflow 1”).

        Elasticsearch provides “Ingest Attachment” plugin to ingest documents into the cluster. The “Ingest Attachment” plugin is based on open source Apache Tika project. Apache Tika is an open source toolkit that detects and extracts metadata and text from many different file types (like PDF, DOC, XLS, PPT etc.). The “Ingest Attachment” plugin uses the Apache Tika library to extract data for different file types and then store the clear text contents in Elasticsearch as json-type documents. The plugin also stores the full-text extract version of the different file types as an element within the json-type document. Once the metadata and the full-text extraction is done and stored in clear-text json-style format within Elasticsearch. From that point forward Elasticsearch uses the Apache Lucene search engine to allow full-text searching capability by doing “Analysis” and “Relevance” ranking on the full-text field.

        Use Case 2

        Using Elasticsearch as a NoSQL data store to store logs from various sources (apache server logs, syslogs, IIS logs etc.) to do visual data analysis using Kibana. The architectural diagram in section titled “Architectural Overview” in this article shows how ELK+ stack can be used for this use case. I am not going to elaborate more on this use case besides providing a few additional informational points (or take away notes)
        • It’s possible to directly send log data from Filebeat to Elasticsearch cluster (bypassing the Logstash)
        • Filebeat has a built in backpressure sensitive protocol to slow down the sending of log data to Logstash and/or Elasticsearch if they are busy doing other activities.

        A few take away

          • In order to avoid the Elasticsearch nodes from doing extraction of metadata and full text data from different file types while files are sent to “Ingest Attachment” plugin in real time and there by resulting in CPU and resource load on the ingest node. An alternate way to do the same will be to use Apache Tika as an offline utility and use it to extract metadata and full-text data using a batch program and then using that batch program to send data directly to Elasticsearch as a “json-type” document. This eliminates increasing payload pressure on Elasticsearch cluster as the batch program can be run outside the cluster nodes, full-text data extraction is a very CPU intensive operation. This batch program approach will also work for Apache Solr as the same batch program can be used to route the data to Apache Solr and/or Elasticsearch
          • Another benefit of off-loading the full-text data extract operation outside of Elasticsearch is that you do not have to use Apache Tika for metadata and full-text data extraction, you can use other commercial alternatives.
          • For High availability and large Elasticsearch clusters, try to utilize different Elasticsearch nodes-types (a node is a physical machine and/or VM in an Elasticsearch cluster). Below are the different Elasticsearch note-types 
          Master eligible Node

          This node-type allows the node to be eligible for being designated as a master node within the Elasticsearch cluster. For large clusters, do not flag “master eligible” nodes to function as “data” nodes and vice-versa

          Data Node 

          This node-type allows the node to be a “data” node in an Elasticsearch cluster.

          Ingest Node

          This node-type allows the node to be a “ingest” node. If you were using the “Ingest Attachment” plugin, then it is a good idea to send data traffic associated with file uploads to “ingest” only nodes as the full-text extraction from different file-types is a very CPU exhaustive process and you are better off dedicating nodes just to perform that operation

          Coordinating Node

          This node-type allows the node to co-ordinate the search request across “data” nodes and aggregate the results before sending the data back to the client. As a result, this node should have enough memory and CPU resources to perform that role efficiently.

          Tribe Node

          It’s a special type of “coordinating” node that allows cross-cluster searching operations

          NOTE: by default an Elasticsearch node is “master-eligible” node, “data” node, “ingest” node as well as “coordinating” node. This works for small clusters but for large clusters you need to plan these node roles (types) for scalability and performance.

          • Both Apache Solr and Elasticsearch are competing open source platforms utilizing Apache Lucene as the search engine under the hood. Elasticsearch is more recent and is able to benefit from lessons learned from previous competing platforms. Elasticsearch has gained popularity due to its simplicity of setting up the cluster versus Apache Solr and as mentioned earlier many cloud providers (like AWS) are providing Elasticsearch as a “Platform” as a service (PaaS)
          • Elasticsearch has a product called X-Pack, at this point of time you have to pay for this but this year the company behind Elasticsearch is going to make the X-Pack offering open source. X-Pack provides following capabilities


            1. Secures your Elasticsearch cluster through authentication/authorization
            2. Sending alerts
            3. Monitoring your clusters
            4. Reporting capability
            5. Exploring relationship between your Elasticsearch data by utilizing “Graph” plotting.
            6. Machine Learning of your Elasticsearch data

            Conclusion
            ELK+ stack is an open source platform that allows you to quickly set up a cluster for performing visual data analysis as well as provide a “google” search like capability within your organization and it’s all “free”. I hope this article will give you enough details to use the ELK+ stack in your own organization