Introduction
In this article I plan to show how to install and configure Kubernetes (K8S) on your local laptop to manage multi-node Container clusters. This blog is written with the understanding that you are not using Docker swarm in your company to create multi-node Docker container clusters. Prior to Docker swarm, DevOps had to use tools like Kubernetes to manage multi-node clusters. Kubernetes is still used for multi-node cluster management for large-scale environments because of its wider acceptance within the DevOps community as a mature tool for cluster management. If you want to configure a multi-node cluster using Docker swarm then I recommend you read my other blog on Docker swarm –
Architectural Overview
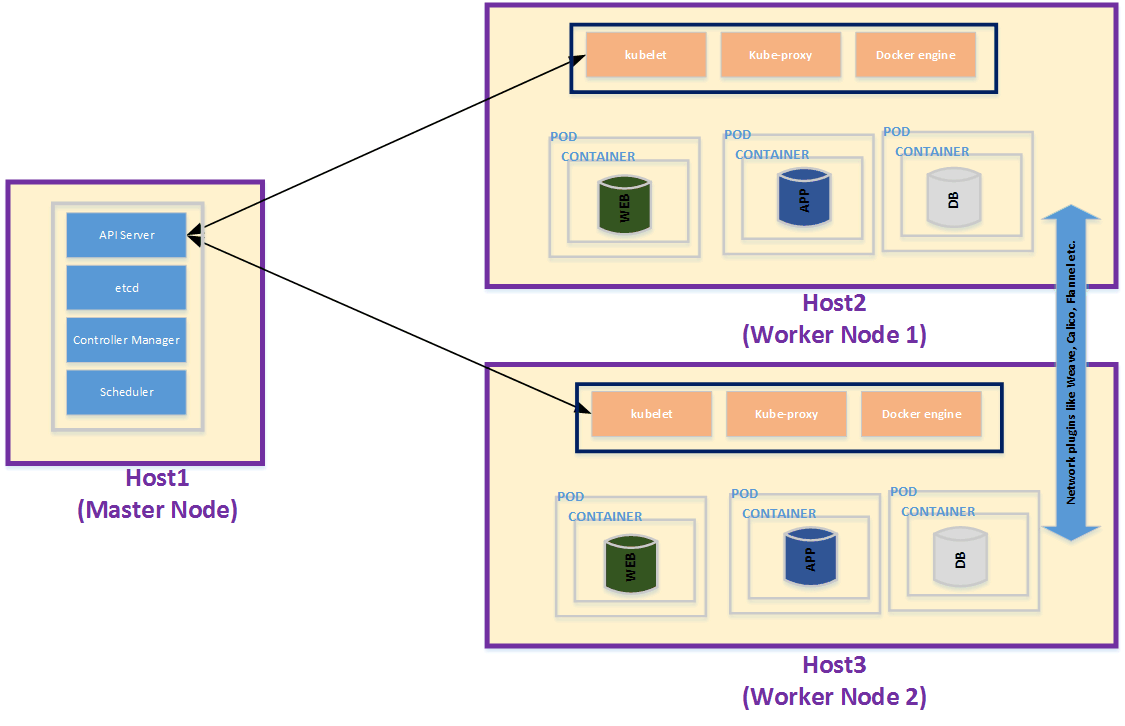
Overview of the various elements depicted in the Architectural Diagram
Diagram elements
|
Description
|
Host1 (Master Node)
|
The master node for Kubernetes – this is the node which does the orchestration and coordination with all the worker nodes.
|
Host2 (Worker Node 1)/ Host3 (Worker Node 2)
|
The worker nodes are the ones where PODs are deployed.
|
API Server
|
The API Server exposes RESTful API used by worker nodes (and utility like kubectl) to configure and participate in the Kubernetes cluster.
|
etcd
|
A distributed key-value store used by the cluster to store configuration details needed for the cluster.
|
Controller manager
|
Responsible for maintaining replicas of POD. So if a POD dies for whatever reason, it is this component that spawns a new POD to maintain the expected number of replica count.
|
Schedular
|
This component is what schedules and manages which POD runs on which worker node.
|
Kubelet
|
A service that runs on all nodes (master and worker nodes). The worker node kubelet use the RESTful API exposed by the API server to co-ordinate with the master node. The master node configuration of the kubelet does not register for cluster work (since it is a master and not a worker).
|
kube-proxy
|
Runs on each worker node and proxies the communication between Kubernetes services that are exposed to the node and the internal container running inside the POD.
|
Docker engine
|
The container software running inside each POD. This can be the Docker container engine (which is what I plan to use)
|
POD
|
POD is the basic deployment unit in Kubernetes. Each POD can have multiple Docker containers running inside it.
|
Container
|
This is the Docker container that is running the application.
|
Network plugins like Calico, Flannel etc.
|
Network plug-ins allow POD to POD communication. For my installation I am going to use Weave. Kubernetes allows multiple network add-ons via Container Network Interface (cni).
|
 |
The custom Docker image that I created with apache as the base image to make the container that is spawned from this custom image to run as a reverse proxy server for the application server.
|
 |
The custom Docker image that I created with tomcat as the base image which has my Java web application deployed in it.
|
 |
The custom mysql database image that I created with my application tables and data contained in the database.
|
Development Environment
- I plan to use only one worker node instead of two worker nodes as depicted in the architectural diagram. I used VMWare workstation Pro 12 with Ubuntu 17.04 installed in the VM for one master node and one worker node.
- I plan to custom install Kubernetes (K8s) components manually. This is the most tedious approach but helps clear your concepts about how these components need to be configured.
- For my Java web application, I used Java Spring MVC for the front end, Hibernate as an ORM layer with mysql as the database (I am not going to spend much time on explaining this as this is not the focus point of this blog)
Kubernetes installation steps
Step1
Step1a
Let’s enable ipv4 forwarding. In kubernetes, ipv4 forwarding needs to be enabled as per following link
Use the following commands to enable ipv4 forwarding.

Step1b
I suggest you disable the “systemd-resolved” or “dnsmasq” on your node (both master and worker nodes), I am using Ubuntu 17.04, so in my case I do not have “dnsmasq”, I need to disable “system-resolved” as that will create a DNS loop since the “/etc/resolv.conf” contents are inherited by the kubedns deployment pod

Also in NetworkManager configuration "/etc/NetworkManager/NetworkManager.conf” file, under dns section disable the use of NetworkManager calling the systemd-resolved by doing the following changes in "/etc/NetworkManager/NetworkManager.conf” file

On the nodes that uses Ubuntu 17.04, you add name servers not by editing “/etc/resolv.conf” file directly but by adding a tail file in the following location “/etc/resolvconf/resolv.conf.d/tail”
The “/etc/resolvconf/resolv.conf.d/tail” file contents are: 
NOTE: “192.168.164.2” is the DNS server of my VMWare Workstation Pro 12 under which my two nodes (ubuntumaster and ubuntuworker1) are running Ubuntu 17.04.
Step2
Step2a
Let’s rename the Ubuntu VM which will work as a Master node to be ubuntumaster and then do the same for worker node (name the Ubuntu VM as ubuntuworker1). You do that by editing the following files
- /etc/hostname
- /etc/hosts
Step2b
Download kubernetes binaries from the following link –
After you untar the file, you will have to run the following shell script to download the binaries-
“cluster/get-kube-binaries.sh”
The above script will download another tar file “kubernetes-server-linux-amd64.tar.gz” which has all the binaries. Copy the following binaries to
/usr/local/bin folder (do that on all master and worker nodes)

NOTE: On the worker nodes you really do not need the following binaries
- kube-apiserver
- kube-controller-manager
- kube-scheduler
Step2c
Let’s install etcd and docker using the following command (I am using Ubuntu 17.04, Codename: zesty)
- sudo apt-get update
- sudo apt-get install etcd docker.io
NOTE: For the worker nodes you do not need to install the etcd package but you do need to install the docker packer - sudo apt-get install docker.io
By default etcd service listens on localhost IP; in order for it to listen on an IP that is visible to all nodes in the cluster make the following change to the “/etc/systemd/system/etcd2.service” file. NOTE: Change the IP to reflect the public facing IP of the Master node VM

NOTE: “etcd” is exposed on an unsecure “http” protocol, in production try to use “https”
Let’s also install network tools like netstat as you will need it for troubleshooting using the following command
- sudo apt-get install net-tools
Step3
Step3a
Let’s create the following folders on master nodes as well as worker nodes
- mkdir -p /srv/kubernetes/
This folder stores the certificates used by pods and kube-apiserver
- mkdir -p /var/lib/kubelet
This folder is used to store the configuration file used by the following Kubernetes (K8s) modules
- kubelet
- kube-apiserver
- kube-controller-manager
- kube-proxy
- kube-scheduler
Let’s create the following folders on master node only
- mkdir -p /etc/kubernetes/manifests
This folder will contain “json” files that are hot deployed by kubelet that runs on master node. Typical K8s modules that are defined in the json files are
- kube-apiserver
- kube-controller-manager
- kube-scheduler
Step3b
Let’s create certificates used by the kubernetes cluster. I am using openssl package to create self-signed certificates using the following commands

Use the following command to view the ca.crt and server.crt
openssl x509 -noout -text -in /srv/kubernetes/server.crt
The openssl.cnf needs to contain the logical names by which the server certificates are referenced as mentioned in the following link
Since Ubuntu comes with openssl pre-installed use the original “/usr/lib/ssl/openssl.cnf” file and make following changes to it

NOTE: Change the IP to reflect the public facing IP of the Master node VM as the kube-apiserver is going to run on the master node as a pod. In this example IP.1 should be 192.168.164.201 (also 11.0.0.1 is the cluster ip for kubernetes service that gets exposed in the cluster, depending on what subnet you pass to hypercube apiserver (--service-cluster-ip-range=11.0.0.0/24) change 11.0.0.1 to reflect the first IP in that subnet.
Also given that we are creating self-signed certificates, let’s concatenate the certificate authority’s certificate to the server certificate to avoid “unknown CA authority” error using the following command
- cat /srv/kubernetes/ca.crt >> /srv/kubernetes/server.crt
Step4
Now let’s create the client certificates that will allow the K8s modules and cluster administrator’s access to Kubernetes API Server via REST API exposed by the API server. Let’s create two client certificates one used by all K8s modules and one used by cluster administrators
Step4a
Use the following command to create and sign the client certificate used by all K8s modules to connect to Kubernetes API server


A few points about the above commands
- I am using client certificate based authentication with client certificates signed with self-signed certificate authority using openssl package.
- The Command Name (CN) is used as the user name and Organization (O) is used for identifying the groups the user belongs to.
- I am using the group “system:masters” for the K8s modules client cert to allow cluster-admin role to all K8s modules (Try to make this access more restrictive, I am using the super role to make things easy for me, but do not do the same in prod environment)
- The group “system:masters” is associated with the pre-defined ClusterRole “cluster-admin” and ClusterRoleBinding also called “cluster-admin”
Let’s create the config file that is used by the K8s modules to connect to API server using the following commands
A few points about the above commands
- The above commands will create a config file in /home/testuser1/.kube/ folder (here the Ubuntu user who is creating the config file is “testuser1” hence the config file gets created in “testuser1” home folder)
- I am embedding the client certificate in the config file which is going to be used by K8s modules to connect to API server
Copy the “/home/testuser1/.kube/config” to /srv/kubernetes/kubeconfig” and “/var/lib/kubelet/kubeconfig” and then delete the config file. You do not need this configuration file as it does not have the client certificates that you will need to connect to kube-apiserver. Details about how these files are used by K8s cluster
- /srv/kubernetes/kubeconfig - The API server will mount this configuration file for all pods that will use this configuration file to connect to the API server in the cluster via REST API
- “/var/lib/kubelet/kubeconfig – The kubelet binary will use this configuration file to connect to the API server. NOTE: This file should be copied to all nodes (manager as well as worker nodes)
Step4b
Use the following command to create and sign the client certificate used by all cluster administrators to connect to Kubernetes API server
A few points about the above commands
- I am using client certificate based authentication with client certificates signed with self-signed certificate authority using openssl package.
- The Command Name (CN) is used as the user name and Organization (O) is used for identifying the groups the user belongs to.
- I am using the group “myclusteradmgrp” for the K8s cluster administrators; this certificate is issued for the user “myclusteradmclicert1” who is assigned to the group
“myclusteradmgrp” - In the next steps I am going to define a cluster wide ClusterRole (“myclusteradmrole”) that has super admin privileges and then use a ClusterRoleBinding (“myclusteradmrolebind”) to associate the group “myclusteradmgrp” to the ClusterRole (“myclusteradmrole”)
Let’s use the following YAML to define a ClusterRole – “myclusteradmrole” and a ClusterRoleBinding – “myclusteradmrolebind”.
YAML for ClusterRole – “myclusteradmrole”

YAML for ClusterRoleBinding – “myclusteradmrolebind”
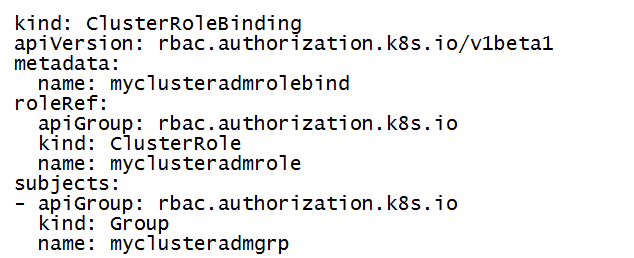
As mentioned earlier the ClusterRole (“myclusteradmrole”) has super admin privileges and the ClusterRoleBinding (“myclusteradmrolebind”) associates the group “myclusteradmgrp” (defined in the client certificate) to the ClusterRole (“myclusteradmrole”)
Let’s create the config file that is used by the K8s administrator “myclusteradmclicert1” to administer the cluster
A few points about the above commands
- The above commands will create a config file in /home/testuser1/.kube/ folder (here the Ubuntu user who is creating the config file is “testuser1” hence the config file gets created in “testuser1” home folder)
- I am embedding the client certificate in the config file which is going to be used by K8s administrator “myclusteradmclicert1” to connect to API server
Step5
Let’s now install the following modules of K8s on master node
- kubelet
- kube-apiserver
- kube-controller-manager
- kube-scheduler
- kube-proxy
For the following three components - kube-apiserver, kube-controller-manager and kube-scheduler, I will use the template mentioned in the following link with arguments that are specific to my environments mentioned below. All three will run as “pods” in my kubernetes cluster
Step5a1
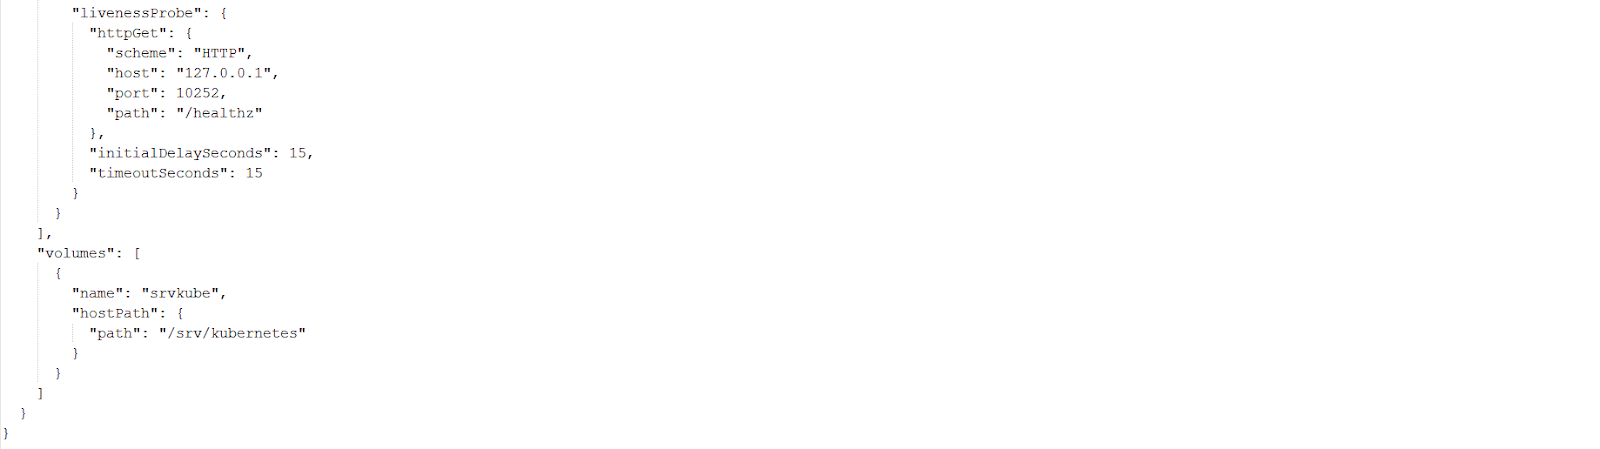
For kube-apiserver the YAML file (“kube-apiserver.json”) is shown below


A few points about the above kube-apiserver YAML
- --authorization-mode [set to Role Based Authorization Control (RBAC), this flag is what controls what authorization controller K8s uses. If you want to allow access to everything without any authorization once user is authenticated then use the following value for this flag - "AlwaysAllow” this is the default value]
- --admission-control (these values are recommended values as per the following link - https://kubernetes.io/docs/admin/admission-controllers/ (this may change with newer Kubernetes release versions so check this link before setting the values)
- For the various parameters used by kube-apiserver pod refer to the following link - https://kubernetes.io/docs/admin/kube-apiserver/
Step5a2
For kube-controller-manager the YAML file (“kube-controller-manager.json”) is shown below

A few points about the above kube-controller-manager YAML
- "--kubeconfig=/srv/kubernetes/kubeconfig" this flag points to the same configuration file that is configured in Section 4a. The way this configuration file is available to the kube-controller-manager is that it is volume mounted on the same node where the file is created and in Section 4a, I am creating the “kubeconfig” file on the master node (“ubuntumaster”) where this “kube-controller-manager“ pod is going to run.
- For the various parameters used by kube-controller-manager pod refer to the following link - https://kubernetes.io/docs/admin/kube-controller-manager/
Step5a3
For kube-scheduler the YAML file (“kube-scheduler.json”) is shown below


A few points about the above kube-scheduler YAML
- "--kubeconfig=/srv/kubernetes/kubeconfig" this flag points to the same configuration file that is configured in Section 4a. The way this configuration file is available to the kube-scheduler is that it is volume mounted on the same node where the file is created and in Section 4a, I am creating the “kubeconfig” file on the master node (“ubuntumaster”) where this “kube-scheduler“ pod is going to run.
- For the various parameters used by kube-scheduler pod refer to the following link - https://kubernetes.io/docs/admin/kube-scheduler/
Step5b
The kubelet and kube-proxy needs to run on all nodes (technically the master/manager node does not need the kube-proxy running but all other nodes need that so that iptable rules are correctly configured on the host machines (nodes) for traffic routing within the K8s cluster pods/services as well as outside the K8s cluster.
Step5b1
Run the following shell for starting kubelet on master node

A few points about the above command
- The kubelet on master will look at the following folder – “--pod-manifest-path=/etc/kubernetes/manifests” to run the three K8s pods mentioned in earlier sections Step5a1, Step5a2 and Step5a3 (put the following three json files - kube-apiserver.json, kube-controller-manager.json and kube-scheduler.json in the folder “/etc/kubernetes/manifests”, this needs to be done only on master node)
- Use the following flag “--kubeconfig=/var/lib/kubelet/kubeconfig” to point to the configuration file to use to connect to the API server using K8s module client certificate created in Section - Step4a. This is the default location the kubelet binary will look at if you exclude the flag.
- For the various parameters used by kubelet binary refer to the following link - https://kubernetes.io/docs/admin/kubelet/
Step5b2
Run the following shell for starting kube-proxy on master node (technically not needed)
Step5b3
Run the following shell for starting kubelet on all worker nodes

A few points about the above command
- The kubelet on worker nodes do not need to have the following flag specified “--pod-manifest-path=/etc/kubernetes/manifests” as that flag is used only on master nodes
- I am using the “--cluster_dns=11.0.0.100” flag to point to the “kubedns” service, you need to change that to be whatever IP you are using for your “kubedns” service
Step5b4
Run the following shell for starting kube-proxy on all worker nodes
Step6
Step6a and Step6b should be repeated on all nodes. Step6c creates a DaemonSet for weave so as soon as a new worker node gets added to the cluster the Kubernetes cluster will deploy that DaemonSet on the new node automatically there by providing the weave pods to the new worker nodes. You do, however, need to deploy the “cni loopback” plugin manually hence Step6a/Step6b is needed on all nodes.
Step6a
For installing weave lets first create the folders where weave pods will install the weave binaries and configuration files

Step6b
We also need to install the cni loopback plugin as mentioned in the following link
In order to install the same use the following command
curl -fsSL 'https://github.com/containernetworking/cni/releases/download/v0.5.2/cni-amd64-v0.5.2.tgz' | tar xvz -C /opt/cni/bin/
The above command will install the following binaries in / opt/cni/bin/ folder

Step6c
Use the following link to get the latest YAML file for weave network which will run as a DaemonSet within the K8s cluster
For this blog I am using the following version
Use the following command to install the YAML file in the kubernetes (K8s) cluster

Step7
Lets now install kube-dns pod (actually “Deployment” kind in K8s) so services that are exposed in the cluster are logically referenced with names.
Also if you want to have the kube-dns pods running on the master node then I suggest before adding any worker nodes to the cluster do the kube-dns install first before adding the worker nodes to the cluster (basically do not do what’s described in Section Step5b3 and Step5b4 above, do the kube-dns install described in this section first).
NOTE: It’s possible to add the worker nodes first and then use constraints in your YAML code to ensure that the kube-dns pods are launched on master node only (assuming that’s what you want)
Step7a
Use the following links to download the YAML for kube-dns
This gives you details for installing all add-ons including kube-dns
This is where you can get the YAML files for kube-dns pods
I used the following files to install the kube-dns Deployment
- Use the following link to download and install the ConfigMap
No changes are needed for this YAML file. You install the same using the following command
“kubectl create –f kubedns-cm.yaml”
- Use the following link to download and install the ServiceAccount used by kube-dns pods
No changes are needed for this YAML file. You install the same using the following command
“kubectl create –f kubedns-sa.yaml”
- Use the following link to download and install the kube-dns pods
After you download this file you can rename the file to be “kubedns-controller.yaml”.
Following changes should be done to the YAML file
- Replace the environment variable inside the file contents with following value – replace “$DNS_DOMAIN” with “cluster.local” across all instances within the file contents.


- For the container (named – “kubedns”), pass the following parameters

- For the container (named – “kubedns”), mount the node folder “/srv/kubernetes” which has the kubeconfig configuration file that is passed to the “kubedns” container via the “- --kubecfg-file=/srv/kubernetes/kubeconfig” flag. You also need to mount the optional “kube-dns-config” ConfigMap

After you make the above changes to the “kubedns-controller.yaml” file, you can install the same using the following command
“kubectl create –f kubedns-controller.yaml”
- Use the following link to download and install the kube-dns service
After you download this file you can rename the file to be “kubedns-controller.yaml”.
Following changes should be done to the YAML file
- Replace the environment variable inside the file contents with the IP of the kubedns pod
In the above screen print I am using IP 11.0.0.100 for the kubedns service. You also need to change the kubelet binary run parameters in section Step5b1 and Step5b3 to be as follows
For Step5b1 (master node)

For Step5b2 (all worker nodes)

Step8
Now lets load the docker images that I created for my Jave web application on the two nodes – master node (ubuntumaster) and worker node (ubuntuworker11)
Step8a
As I am not going to upload my custom Docker images to Docker Hub I need to load my custom images on both nodes using the following command
- docker load -i myapache.tar
Loads the custom apache image that acts like a web tier for my java web application
- docker load -i mytomcat.tar
Loads the custom tomcat image that acts like an application tier for my java web application
- docker load -i mylocalsql.tar
Loads the custom mysql image that acts like a database tier for my java web application
Step8b
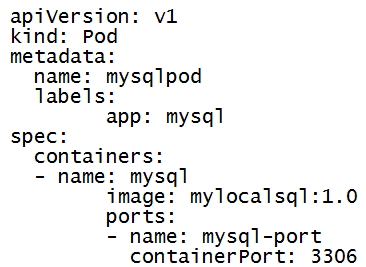
Let’s install the mysql database container in the Kubernetes cluster as a single pod
Use the following YAML to install the mysql pod
Use the following YAML to install the mysql service
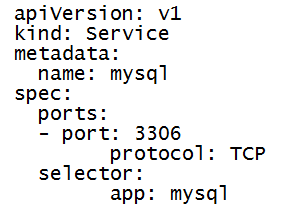
Step8c
Let’s install the mytomcat application server deployment with two replicas (two pods) in the Kubernetes cluster
Use the following YAML to install the mytomcat deployment

A few things about the above YAML file
- The tomcat application server is connecting to the mysql service using the DNS name “mysql”. This is working because kubedns service is translating this logical name into IP of the mysql pod behind the scene
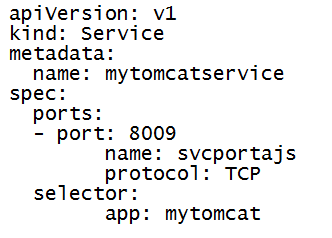
Use the following YAML to install the mytomcat service
Step8d
Let’s install the myapache web server deployment with two replicas (two pods) in the Kubernetes cluster
Use the following YAML to install the myapache deployment

A few things about the above YAML file
- The myapache web server is connecting to the mytomcat service using the DNS name “mytomcatservice”. This is working because kubedns service is translating this logical name into IP of the two mytomcat deployments and is routing the traffic in a round robin manner to the two mytomcat pods at port “8009”
Use the following YAML to install the myapache service

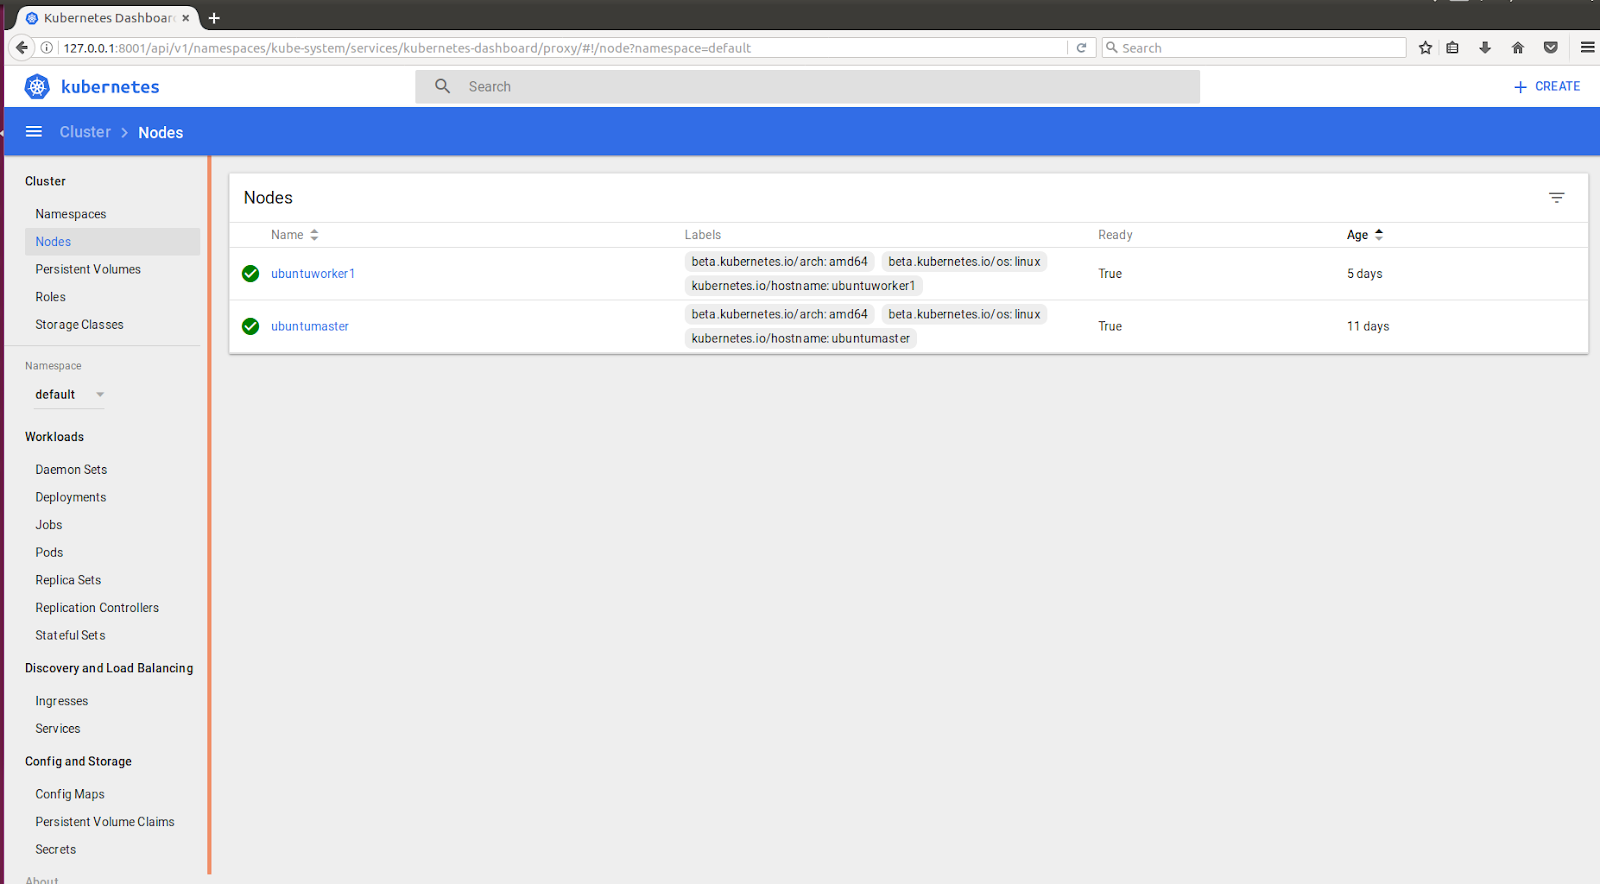
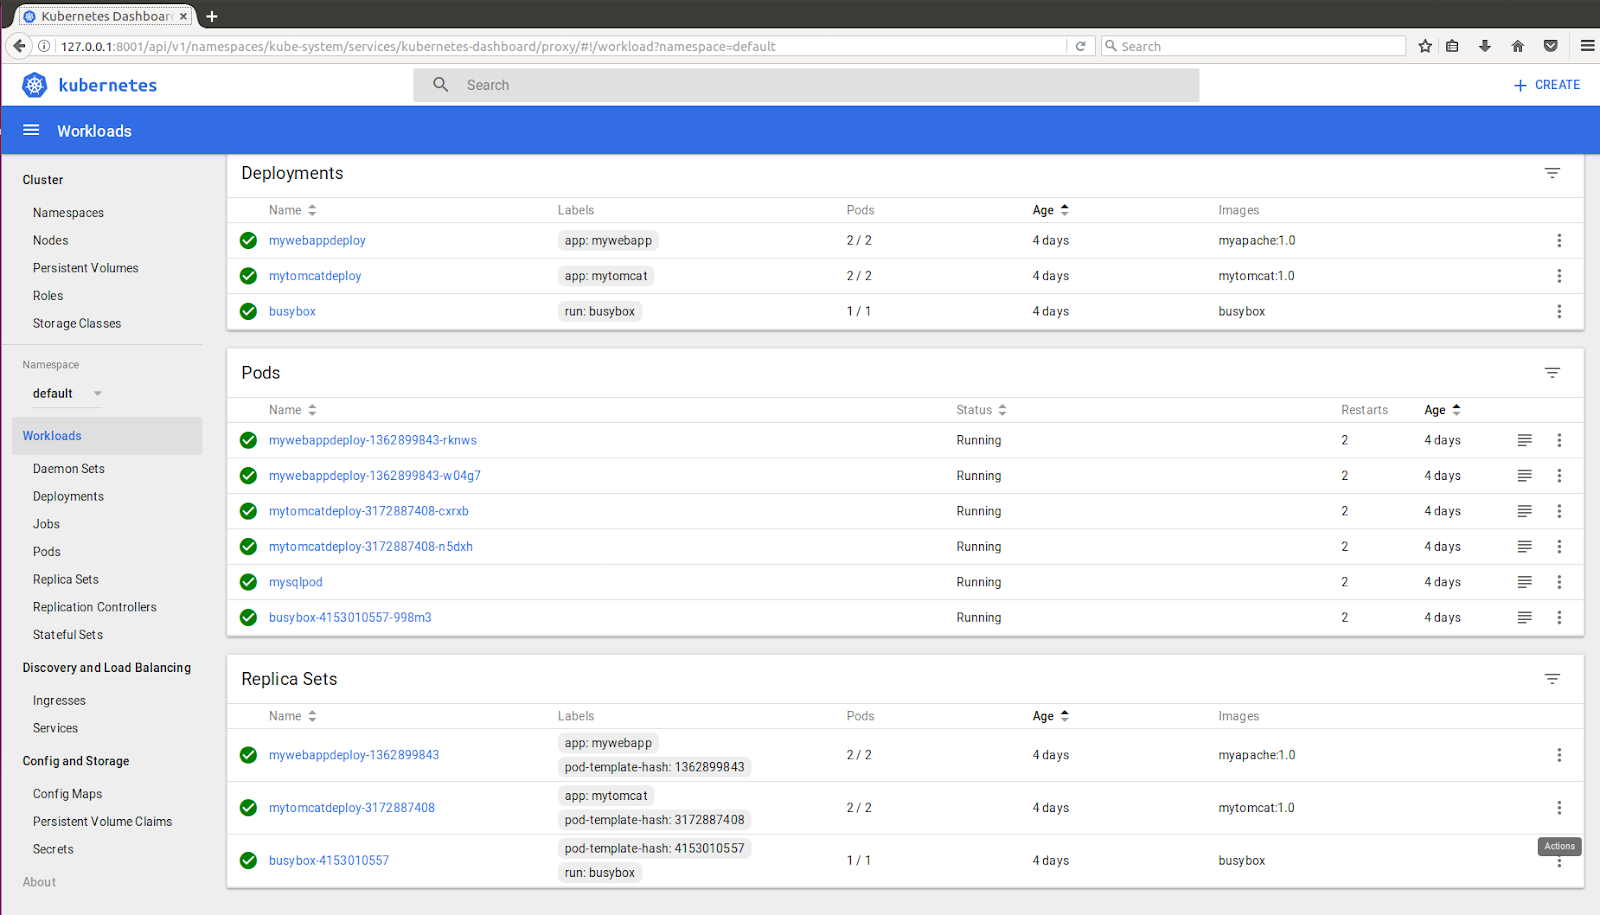
Kubernetes Dashboard
If you want to administer kubernetes cluster via a web interface then you can use the Dashboard which is a web-based kubernetes user interface.
Step1
Use the following command to install the dashboard
The following link is where the above YAML file is obtained from
That’s pretty much it. The above command will install the Dashboard in the K8s cluster. Since I am using client certificate based authentication and have not enabled the basic authentication (via username/password), I will have to use the kubectl as a proxy to connect to the cluster, the config file in “/home/testuser1/.kube/” folder will be used by the proxy to connect to the API server via REST API using the client certificates stored in the config file.
Use the following command to launch the proxy
kubectl proxy
NOTE: I launched the proxy in my ubuntuworker1 node, it can run anywhere as long as you have the kubectl utility and the client cert that goes with it available on that machine (the client cert is embedded in my config file)
After starting the proxy you can access the Dashboard on that machine only via the following link
K8S monitoring via Grafana, Heapster and InfluxDB
In this section I plan to show how to install a widely used dashboard that comes with more graphical bells and whistles than what you get from Kubernetes Dashboard mentioned in the earlier section

Overview of the various elements depicted in the Architectural Diagram
Diagram elements
|
Description
|
Kubelet
|
A service that runs on all nodes (master and worker nodes). The worker node kubelet use the RESTful API exposed by the API server to co-ordinate with the master node. The master node configuration of the kubelet does not register for cluster work (since it is a master and not a worker).
|
cAdvisor
|
Its built into the Kubelet binary and captures and analyze resource usages.
|
Heapster
|
It’s a cluster wide component that aggregates resource data into InfluxDB datastore
|
InfluxDB
|
The database which stores cluster wide resource information.
|
Grafana
|
The dashboard that renders graphical representation of data stored in InfluxDB by Heapster and allows custom Dashboards to be created for monitoring the cluster’s health.
|
Step1
The YAML files needed to install Grafana, InfluxDB and Heapster can be downloaded from the following links
- For InfluxDB
I did the following changes to above YAML file
You need to create the folder on both nodes as you do not know which of the two nodes the InfluxDB pod will get deployed using the following command “mkdir -p /mygrafanadb/influxdb” (actually you can restrict the creation to ubunruworker1 node only but wanted to simiply the configuration for this blog)
I am storing the InfluxDB data on my node disk so that if the InfluxDB pod is re-spawned it can mount on the node drive without loss of data. In production this drive should be a share drive accessible to all nodes and mounted on all nodes so if you have multiple worker nodes added to the cluster it does not matter where the InfluxDB pod gets re-spawned.
- For Heapster
- For Grafana
I did the following changes to above YAML file

You can install all the YAML files in a folder using the following command
“kubectl create -f
Now the Grafana dashboard is exposed on node port which can be accessed from either nodes (ubuntumaster or ubuntuworker1). You need to configure the DataSource for Grafana by doing the following settings

The username and password for the InfluxDB is “root” and the Database is “k8s”.
NOTE: This data source configuration is technically not needed as Grafana creates one by default based on YAML file installed earlier but I wanted to show this section incase if you have to change the defaults or point to a different data source.
Conclusion
In this blog I showed you how to install each components of Kubernetes manually from scratch, I took this approach to help you understand how the components interact with each other. If you want to work on Kubernetes without going through the above exhaustive steps, I suggest you use one of the following options
- Minikube
- Kubeadm
Good blog post on Kubernetes setup, all the procedure steps seems simple and easy followup. Thanks a lot.
ReplyDeleteBest Regards,
DevOps Training in Hyderabad
DevOps Online Training in Hyderabad
DevOps Online Training
DevOps Institutes in Hyderabad
Learn DevOps Online
Best DevOps Training Institute in Hyderabad
Best DevOps Online Training Institute in Hyderabad
Best DevOps Online Training in India
DevOps Institute in Hyderabad
Best DevOps Training
DevOps Training and Certification
learn DevOps
DevOps Institutes in Ameerpet
DevOps Training
DevOps Courses
DevOps Certification Training
CourseIng
CIITN is located in Prime location in Noida having best connectivity via all modes of public transport. CIITN offer both
ReplyDeleteweekend and weekdays courses to facilitate Hadoop aspirants. Among all Hadoop Training Institute in Noida , CIITN's Big Data and Hadoop Certification course is designed to prepare you to match
all required knowledge for real time job assignment in the Big Data world with top level companies. CIITN puts more focus in project based training
and facilitated with Hadoop 2.7 with Cloud Lab—a cloud-based Hadoop environment lab setup for hands-on experience.
CIITNOIDA is the good choice for Big Data Hadoop
Training in NOIDA in the final year. I have also completed my summer training from here. It provides high quality Hadoop training with Live
projects. The best thing about CIITNOIDA is its experienced trainers and updated course content. They even provide you placement guidance and have
their own development cell. You can attend their free demo class and then decide.
Hadoop Training in Noida
Big Data Hadoop Training in Noida
it's very interesting to read, thanks for sharing!!
ReplyDeleteDevOps Online Training
ReplyDeletewell! Thanks for providing a good stuff
Docker and Kubernetes Training
Docker Training
Docker Online Training
Kubernetes Online Training
Docker Training in Hyderabad
Nice Article!! Thank you for your valuable content..
ReplyDeleteDevOps Training
DevOps Online Training
This comment has been removed by the author.
ReplyDeletenice thanks for sharing...................!
ReplyDeleteAnsible online training
Appium online training
AWS online training
ice blog.. Thanks for sharing this blog information with us…
ReplyDeleteDevOps Training
DevOps Online Training
Thanks a lot. It is useful to be well written, clear and concise
ReplyDeleteWorkday Software Training
Workday Online Training Hyderabad
I really appreciate this wonderful post that you have provided for us. I assure this would be beneficial for most of the people. Quality Management Services
ReplyDeleteGreat Blog!!! thanks for sharing with us.
ReplyDeletecareer in software testing
software testing career