Introduction

Common software & network installation steps


This is a follow-up article to my overview article on using Hadoop, Kafka and Sparks (http://pmtechfusion.blogspot.com/2017/11/big-datadata-science-analytics-apache_20.html ) I plan to provide detail steps to first install Apache Hadoop on one Virtual Machine (VM) and then provide specifics of installing it as a true distributed multi-node cluster on multiple VM. I will also provide steps to install Spark and Kafka and complete this blog with an example of how to use the three technologies in your real world application.
Architectural Overview
The above diagram provides you with an overview of where each components are deployed on four VM.
Development Environment
- I will have one VM where I will install Kafka, Spark and ZooKeeper
- I will have three VM where I will install Apache Hadoop, one VM will act as the master node and the other two VM will act as data nodes
- I have written a simple Python script that runs as a Spark job using YARN as a cluster manager and Apache Hadoop as the distributed file system.
- All VM run Ubuntu 16.04
- Apache Hadoop version is 2.8.1
- Apache Kafka version is 1.0.0 (I am using Scala 2.11 binary distribution)
- Apache Spark version is 2.20
- Apache Zookeeper version is 3.4.8-1
- The VM on which Apache Kafka, Apache Spark and Apache ZooKeeper is installed is named – “hadoop1”, the VM that is acting as a master node for Hadoop is named – “hadoopmaster” and the two VM that run as slaves for Hadoop cluster are named – “hadoopslave1”, “hadoopslave2”.
- I am mentioning the versions of various software modules and Operating System (OS) I have used so if you want to create your own working environment you know which versions worked for me. It’s possible that you may end up using a different version by the time you start building your own development environment.
Common software & network installation steps
This section details installation steps for common software’s (like Java) needed by all components.
Step1
Let’s install Java using the following command (NOTE: You need to install Java on all four VM)
sudo apt install openjdk-8-jdk-headless
Step2
As we need Java to be an environment variable and a part of bash environment variable make sure that you add the same using the following steps -
Step2a
Edit the “/etc/environment” file and add the following lines
Step2b
Edit the “~/.bashrc” file and add the following lines
NOTE: The above file will need to be edited for different user accounts that you will have to create for each component. The different accounts are mentioned below
- For Hadoop I am creating an user - hduser and group - hadoop
- For Kafka I am creating an user - Kafka and group – Kafka
- For Spark I am creating an user – testuser1 and group - testuser1
Make sure the “~/.bashrc” file for users - hduser, Kafka and testuser1 have the above java environment variable included.
Step3
Let’s install “ssh” on all VM as you will need the same to start Hadoop cluster on a multi-node Hadoop cluster. You also need “ssh” to do remote administration of all components related to Hadoop, Kafka and Spark.
sudo apt install ssh
Step4
In order to allow all the VM to communicate via the network with each other. Add the following host entries to all the four VM.
Kafka & Zookeeper installation steps
Kafka needs Zookeeper for distributed system co-ordination. The installation steps below show how to install the same on one VM. You should know that both Kafka as well as ZooKeeper can be installed on multiple VM as separate distributed systems for High Availability (HA) and fail-over. I am installing them along with Spark on one VM as my laptop resource limitation will not allow me to create infinite VM (I wish).
Step1
The version I downloaded for this blog is -
Step1a
Unzip the downloaded file into the “/usr/local/kafka” folder with the following steps
$ cd /usr/local
$ sudo tar xzf kafka_2.11-1.0.0.tgz
$ sudo mv kafka_2.11-1.0.0 kafka
Step1b
Let’s create a user – “kafka” and group – “kafka” using the following commands -
sudo addgroup kafka
sudo adduser --ingroup kafka kafka
Step1c
Let’s grant access to “kafka” user/group to the “/usr/local/kafka” folder using following commands
chown -R kafka:kafka "/usr/local/kafka"
Step2
Let’s install ZooKeeper using the following command
sudo apt install zookeeperd
The above command will install and run ZooKeeper on port “2181”
Step3
Now we need to run command to start Kafka and create a topic
Step3a
Run the following commands to start and stop Kafka server
Step3b
Run the following command to create a Topic named “apacheLogEntries”, this topic will store apache web logs for doing real-time data analytics
At this point of time Kafka and ZooKeeper installation is completed. In the “Use Case” section below I will provide details of how to send apache access log entries to the above created topic and also how to make Spark consume the “apacheLogEntries” Topic to do real-time data analytics
Apache Spark installation steps
Step1
Download the latest Spark binary from the following URL - http://spark.apache.org/downloads.html
The version I downloaded for this blog is –
Step1a
Unzip the downloaded file into the “/usr/local/spark” folder with the following steps
$ cd /usr/local
$ sudo tar xzf spark-2.2.0-bin-hadoop2.7.tgz
$ sudo mv spark-2.2.0-bin-hadoop2.7 spark
Step1b
Lets create a user – “spark” and group – “spark” using the following commands -
sudo addgroup spark
sudo adduser --ingroup spark spark
Step1c
Let’s grant access to “spark” user/group to the “/usr/local/spark” folder using following commands
chown -R spark:spark "/usr/local/spark"
Step2
Step2a
Edit the “/etc/environment” file and add the following lines
Step2b
Edit the “~/.bashrc” file and add the following lines
The above environment variable needs to be set in “~/.bashrc” file for “spark” user as well as “hduser”, the latter is needed because when you use YARN and Hadoop for running Spark jobs you will have to submit the same to the cluster with “hduser” credentials as the Hadoop cluster is set to accept jobs from “hduser” account only.
Step3
Copy the “/usr/local/spark/conf/spark-env.template” file into “/usr/local/spark/conf/spark-env.sh” and add the following line to the “/usr/local/spark/conf/spark-env.sh” file
The above line can be commented out if you plan to run Spark as a standalone cluster where you do not want to run the spark job on Hadoop using YARN as its cluster manager
NOTE: The above line should point to the “hadoop" configuration folder. This is the same configuration folder that all Hadoop node’s read from when they start up. So any Hadoop configuration changes done in this folder is also visible to Spark jobs. This is how Spark knows about the Hadoop cluster configuration and where the YARN is running.
That’s it Spark is now ready to submit job to Hadoop YARN
If you want to just use Spark to do your data analytics, then “Step3” above should not be done as by default Spark is configured to run in standalone mode using its internal Cluster Manager for resource negotiation, in fact, that’s how you should start using Spark to get deep dive hands-on experience with the various Spark modules before using Hadoop’s YARN as the Cluster Manager.(Standalone mode of Spark helps with troubleshooting your Spark script errors without relying on the goliath - the Hadoop ecosystem).
Apache Hadoop installation steps
Let’s start with installing stand-alone mode of Hadoop on one VM and then I will point out places where you need to deviate from stand-alone steps to create a Multi-Node Hadoop cluster.
In each step mentioned below, I will have two sections, one for single-node Hadoop cluster and another for multi-node. Steps that are common for both will not have these two sub-sections mentioned.
Step1
Download the latest Hadoop binary from the following URL –
The version I downloaded for this blog is –
Step1a
Unzip the downloaded file into the “/usr/local/hadoop” folder with the following steps
$ cd /usr/local
$ sudo tar xzf hadoop-2.8.1.tar.gz
$ sudo mv hadoop-2.8.1 hadoop
Step1b
Lets create a user – “hduser” and group – “hadoop” using the following commands -
sudo addgroup hadoop
sudo adduser --ingroup hduser hadoop
Step1c
Let’s grant access to “hduser/hadoop” user/group to the “/usr/local/hadoop” folder using following commands
chown -R hduser:hadoop "/usr/local/hadoop"
NOTE: Step1, Step1a through Step1c above need to be executed on all nodes of a Multi-Node Hadoop cluster.
Step2
Edit the “~/.bashrc” file and add the following lines
This environment variable needs to be set in the bash shell for the “hduser” as that’s the user we will be using to start the Hadoop cluster as well as submit any jobs to run in the cluster.
NOTE: Step2 above need to be executed on all nodes of a Multi-Node Hadoop cluster.
Step3
We are now going to create a password less “ssh” key for the “hduser” as that is needed for the Hadoop master node to start the “slave” nodes. For stand-alone the slave nodes will run on “localhost” so we need this even for stand-alone Hadoop configuration.
Step3a
Following command will create the public private key, make sure you run this command on shell with “hduser” login
ssh-keygen -t rsa -P '' -f ~/.ssh/id_rsa
Step3b
Stand-Alone
Use the following command to copy the public key of the “Step 3a” above to the authorized key file
cat ~/.ssh/id_rsa.pub >> ~/.ssh/authorized_keys
Now you can test that the password-less ssh login works by running the following command (you should not be asked for a password)
ssh localhost
Multi-Node
Run the following command from the master-node “hadoopmaster” to copy the public key of “hduser” to all the slave nodes (“hadoopslave1” and “hadoopslave2”)
ssh-copy-id -i $HOME/.ssh/id_rsa.pub hduser@hadoopslave1
ssh-copy-id -i $HOME/.ssh/id_rsa.pub hduser@hadoopslave2
Step4
Now we need to change the configuration files for Hadoop cluster on all Hadoop nodes. I will provide the difference between stand-alone and multi-node changes in each respective sections
I will start with multi-node and point the difference
Step4a
Edit or create “/usr/local/hadoop/etc/hadoop/hadoop-env.sh” file and make the following changes to it (NOTE: This change is needed on all nodes and is needed for both stand-alone as well as multi-node Hadoop cluster)
Step4b
Edit or create “/usr/local/hadoop/etc/hadoop/core-site.xml” file and make the following changes
Multi-Node
This change should be done on all master/slave nodes
Standalone
Replace “hadoopmaster” with “localhost”
Step4c
Edit or create “/usr/local/hadoop/etc/hadoop/mapred-site.xml” file and make the following changes (NOTE: This change is needed on all nodes and is needed for both stand-alone as well as multi-node Hadoop cluster)
Step4d
Now you need to create folders on each node where the NameNode and DataNode write to.
Multi-Node
On master, create the following directory structure with access rights to “hduser/hadoop” as shown below
On all slaves which will only run the DataNode just create the folder for “data” with access rights to “hduser/hadoop” as shown below
Standalone
For standalone create the “data” and “name” folders on the single VM.
Step4e
Edit or create “/usr/local/hadoop/etc/hadoop/hdfs-site.xml” file and make the following changes
Multi-Node
On master
NOTE: The replication factor is “3” as the master node is going to run the DataNode as well, so basically the master will act as a “master” as well as “slave” in the cluster. In production, you should not make the “master” node act as “slave”.
On all slaves
Standalone
For standalone use the following configuration setting
NOTE: Replication is set to “1” for stand-alone
Step4f
Edit or create “/usr/local/hadoop/etc/hadoop/yarn-site.xml” file and make the following changes
Multi-Node
On Master as well as slave nodes
Standalone
For standalone use the following configuration setting
A few observations about standalone configuration
- I am running my standalone Hadoop cluster on the same VM (“hadoop1”) where my Spark and Kafka a running
- The memory for the standalone VM (“hadoop1”) is 12GB when I have all three components (Hadoop, Kafka and Spark) running on the same VM.
Step4g
Multi-Node
On Master only, edit or create “/usr/local/hadoop/etc/hadoop/masters” file and include the following line. This file actually controls where the SecondaryNameNode runs in Hadoop cluster (not the name of master node as the file name might suggest).
hadoopmaster
Standalone
This file is not needed for standalone mode
Step4h
Multi-Node
On master only, edit or create “/usr/local/hadoop/etc/hadoop/slaves” file and include the following nodes as slaves (In the example I am using the master node to be a slave node that will run DataNode daemon as well, hence “hadoopmaster” is included in the list below)
hadoopmaster
hadoopslave1
hadoopslave2
Standalone
This file is not needed for standalone mode
That’s is the Hadoop cluster configuration is done, now its time to start the various daemons.
- To start the DataNode and NameNode use the following command
/usr/local/hadoop/sbin/start-dfs.sh
You will have to log in as “hduser” to run the above commands as the above script will use the passwordless “hduser” public key to ssh into other VM (slaves). This command runs from master node – “hadoopmaster”
- To start the ResourceManager and NodeManager use the following command
/usr/local/hadoop/sbin/start-yarn.sh
You will have to log in as “hduser” to run the above commands as the above script will use the passwordless “hduser” public key to ssh into other VM (slaves). This command runs from master node – “hadoopmaster”
- Now use “jps” command to check which daemons are running where
On Master
NOTE: Because I am using master as a slave – DataNode is running on master as well.
On slaves (hadoopslave1 here, same output for hadoopslave2)
Use Case – Apache Log Analytics
In my other blog (http://pmtechfusion.blogspot.com/2017/11/big-datadata-science-analytics-apache_20.html ), in section “Use Case” I provide the description of how I plan to connect the three technologies for a real world Use Case – which is to analyze the Apache Log. Here I plan to provide description of what the Spark job script looks like. I plan to use Python as the scripting language. But I suggest you use “Scala” as that is native language for Spark and will provide better performance than “Python”. I choose “Python” as that is one of the preferred languages (along with “R”) by “Data Scientist”, so its familiar territory.
I will split the “python” script in smaller code snippets and provide comments for each snippet separately
Snippet 1
A few points about the above snippet
- I am using the “pyspark” module to write Spark jobs in python
- I am using the “pyspark.streaming.kafka” module to write real-time kafka streaming consumer for Apache Log.
Snippet 2
A few points about the above snippet
- This method just uses regular expression (re) to split the apache access log messages into manageable collection in python
Snippet 3
A few points about the above snippet
- Give that SparkSession creation is a performance intensive ordeal, the above function is using the singleton pattern to return the same SparkSession to the running python script.
Snippet 4
A few points about the above snippet
- In the above script, I am using the KafkaUtils class methods to create a Kafka consumer group for reading real-time entries from the “apacheLogEntries” Topic that I created in “Kafka & Zookeeper installation steps - Step3b” section in this blog.
Snippet 5
A few points about the above snippet
- This is a method that is used by the SparkSQL in Snippet 6 below to count the apache log entries.
Snippet 6
A few points about the above snippet
- This is where the data is being processed by Spark to generate counts at a “per IP” level.
- In spark real-time streaming, the stream is referred to as “DStream” and each “DStream” consists of multiple RDD which is why each RDD Is processed in a for loop – (lines.foreachRDD(process)
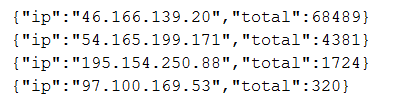
- The line below is just writing the spark sql results back into hadoop DFS
A sample output of the above job is shown below (the results are saved in “json” format as mentioned above
Snippet 7
A few points about the above snippet
- I am using checkpoint to ensure that if the spark jobs fail on one specific worker node then the checkpoint location will allow the job to start from where it left off on another worker node. In order to achieve that, the above checkpoint location “/mysoftware/mysparkcheckpointdir/” should be accessible from all worker nodes of Spark, hence in a cluster the above folder is saved in “hdfs”
Code Snippet 1 through Snippet 7 completes the Apache Log analysis script. In order to send apache log details to Kafka “apacheLogEntries” Topic, use the following script
A few points about the above line
- I am using “kafka-console-producer.sh” a producer shell script that comes with Kafka to send messages to “apacheLogEntries” Topic. In real world you will end up writing application scripts that read from apache log and send messages to the Kafka topic.
- The above script is executed from VM “hadoop1” as that is the VM that has Kafka binaries installed in it.
The above apache log Spark python script can be submitted to the Hadoop cluster using the following command
A few points about the above line
- You submit this Spark job from “hadoop1” VM.
- The “jar” file provided at the command prompt contains the “java” classes needed for Spark to talk with Kafka.
- Same command is needed whether it’s a stand-alone cluster or multi-node cluster
- “apachelogstatssqlKafkaSaveFHadoop.py” is the same python script defined in Snippet Code “1” through “7”
Conclusion
I hope this blog helps you with getting started with using Apache Hadoop, Spark and Kafka for doing batch and real-time data analytics.
Really Good blog post.provided a helpful information.I hope that you will post more updates like thisBig data hadoop online Course Bnagalore
ReplyDeleteInstalling Apache Hadoop, Kafka, and Spark involves several steps due to their distributed nature and specific configuration requirements. Here's a comprehensive guide to installing each of these technologies on a Linux-based system:
Delete1. Apache Hadoop Installation
Apache Hadoop is a framework for distributed storage and processing of large data sets.
Steps to Install Apache Hadoop:
Prerequisites:
Java Development Kit (JDK) installed (preferably JDK 8 or higher).
SSH installed and configured between nodes if setting up a multi-node cluster.
Download and Extract Hadoop:
Download the latest stable release of Apache Hadoop from the official Apache Hadoop Releases Page.
Extract the downloaded tarball to a directory of your choice:
Big Data Projects For Final Year Students
Image Processing Projects For Final Year
bash
Copy code
tar -xzvf hadoop-x.x.x.tar.gz -C /opt
Configure Environment Variables:
Edit your shell profile file (e.g., .bashrc, .bash_profile) to set up Hadoop environment variables:
bash
Copy code
export HADOOP_HOME=/opt/hadoop-x.x.x
export PATH=$PATH:$HADOOP_HOME/bin:$HADOOP_HOME/sbin
Source the profile file to apply the changes:
Deep Learning Projects for Final Year
bash
Copy code
source ~/.bashrc # or source ~/.bash_profile
It'sVery informative blog and useful article thank you for sharing with us , keep posting learn more
ReplyDeleteHadoop administration Online Training Bangalore
Nice blog has been shared by you. before i read this blog i didn't have any knowledge about this but now i got some knowledge.
ReplyDeleteso keep on sharing such kind of an interesting blogs. BigData Course in Delhi
Great article,Thank you..
ReplyDeleteBig Data Online Training
Great Content. It will useful for knowledge seekers. Keep sharing your knowledge through this kind of article.
ReplyDeleteAzure Training in Chennai
Spark Training Institute in Chennai
Microsoft Azure Training in Chennai
Spark Training Academy Chennai
Azure Courses in Chennai
Best Azure Training in Chennai
Spark Course in Chennai
More impressive blog!!! Thanks for shared with us.... waiting for you upcoming data.
ReplyDeleteWhy software testing is important
Importance of software testing
very well explanation. keep updating regularly. Full Stack Classes In Pune
ReplyDelete